This blog has moved and there will be no real content generated here anymore. Please update your links, bookmarks and readers to the new address: the blog now can be found at
http://blog.buechertiger.de
You can still enter the blogiversary-moving day give-away here
And there was a new post today, too.
- I hope to see you there!
Friday, May 29, 2009
Wednesday, May 27, 2009
My Blogiversary = Moving Day = Your Lucky Day
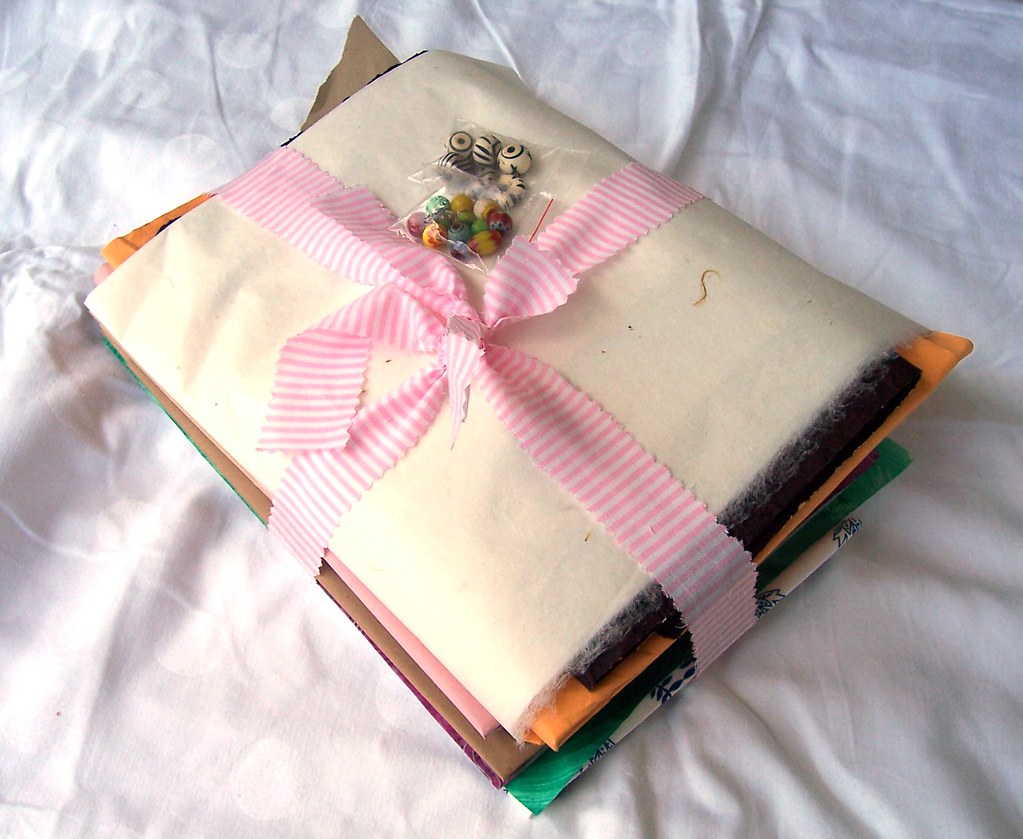
To give this joy back to you, I am going to make you presents in a hobbit-manner: You can win this nice packet of materials and the new green mini Ritter Sport book:
Heute jährt sich zum ersten Mal mein Blog! Es hat mir viel Spaß gemacht hier mit euch allen. Ihr habt alle wesentlich beigetragen, dass ich mich hier in der Blogosphäre wohl gefühlt habe - und da will ich etwas zurückgeben: Nach Hobbit-Art verschenke ich heute zum einen das Paket oben mit diversen Materialien, die für Buchbinder und Scraper interessant sein sollten, und das neue grüne Mini Ritter Sport Büchlein, das hoffentlich allen Bücherfreunden Freude macht.
But, also today I am making a step, that may be fatal to this blog - I am moving it to a new site. I hope you'll all move with me, that those who are so kind to link to this blog from their homepages update their links, and all subscribers change their subscription, and others change their bookmarks. For those who are reading this directly from their browser and remember the address my heart it should get easier: I am now owner of the domain http://buechertiger.de and of course you'll find my blog under the address
http://blog.buechertiger.de.
Heute habe ich nicht nur meine Ein-Jahrs-Feier, ich habe auch einen größeren Schritt vor, von dem ich doch stark hoffe, dass es dieses Blog nicht ruinieren wird: Ich ziehe um auf eine neue Seite. Ich hoffe, ihr werdet alle mit mir umziehen und eure Subskriptionen, Links, und Lesezeichen aktualisieren. Für diejenigen von euch, die jedes Mal die Adresse neu in die Adresszeile eingeben sollte es einfacher werden: Ich bin nun Besitzerin der ganzen Domain http://buechertiger.de und logischerweise findet man mein Blog unter http://blog.buechertiger.de.
Though the blog is up and running there, the rest of the pages is still a bit of a construction site. - Please excuse the inconvenience. Probably in the next weeks the look of it will change again - but I hope that the blog itself will stay pretty much recognizable.
Generally the move has many advantages: The page will be much better structured and it will be easier for me to put content online. So manybe I will finally start to put up some of the instructions that I partly wrote already and partly are planning to write. I am also planning to have better link sections and what not. You can read about my plans on my new blog here.
Der Blog selbst funktioniert schon einwandfrei, aber der Rest der Präsenz, vor allem meine Homepage sind noch verschiedenen Baumaßnahmen unterworfen und werden sich auch noch in nächster Zeit ändern. - Bitte entschuldigt das. Davon abgesehen wird natürlich alles besser und schöner dort.
Da es für mich einfacher sein wird, Inhalt bereit zu stellen, habe ich vor demnächst mal die Anleitungen, die ich teilweise schon geschrieben, teilweise nur geplant habe, breit zu stellen. Ich habe außerdem bessere Link-Seiten in Planung und vieles andere mehr. Über meine aktuellen Pläne könnt ihr hier lesen und weitere Verbesserungsvorschläge sind immer willkommen.
And now you proabably want to know how to win your blogiversary present: Go to http://blog.buechertiger.de to learn more and leave a comment there. This blog here is closed for comments.
Um euer Blogiversary-Geschenk zu gewinnen, geht gleich auf die neue Seite und kommentiert dort!
Danke fürs Lesen und einen schönen Tag noch!
Thanks for reading!
Monday, May 25, 2009
What I Don't Enter in the Current Book Swap
I am currently participating in a book swap at Jackie's book arts forum. (I already mentioned that here.) Today I finished the book that I'll enter in the swap. So now I can show you pictures of the other books which I don't enter. Both of them were made as contributions. But with both I was not quite satisfied.
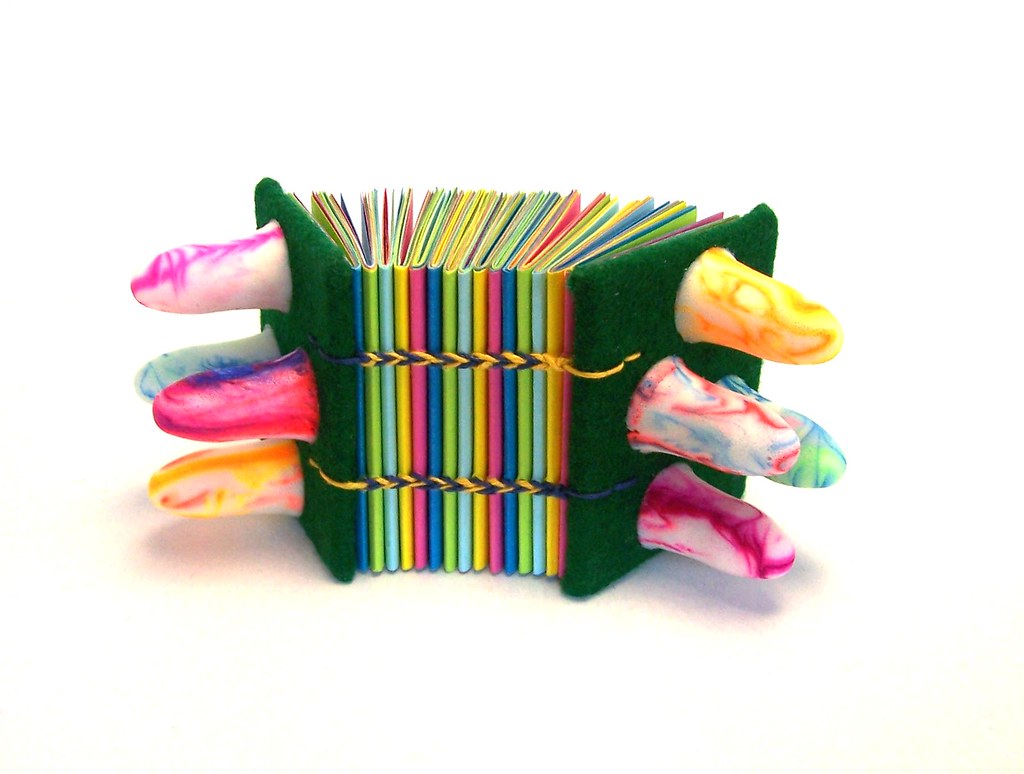
Above you see the book "alien". It is an ordinary Coptic bound book but has earplugs on the covers.
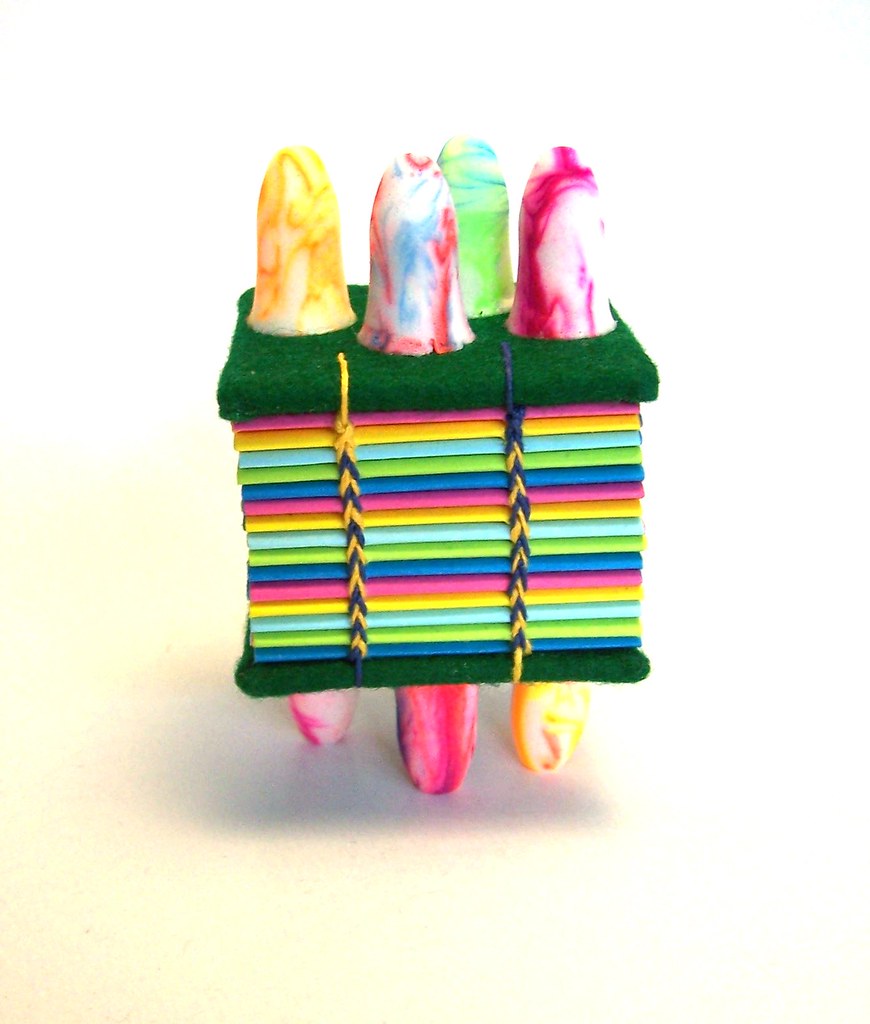
I think it looks hilarious and totally alien. But it isn't a book - neither does it have text nor is it easy to add some because the earplugs rather hinder its functionality. I am still planning to make a box for it. But it is hard for me to stick to projects that are already partially discarded.
The alien book was actually the second one I came up with. The first one was this:
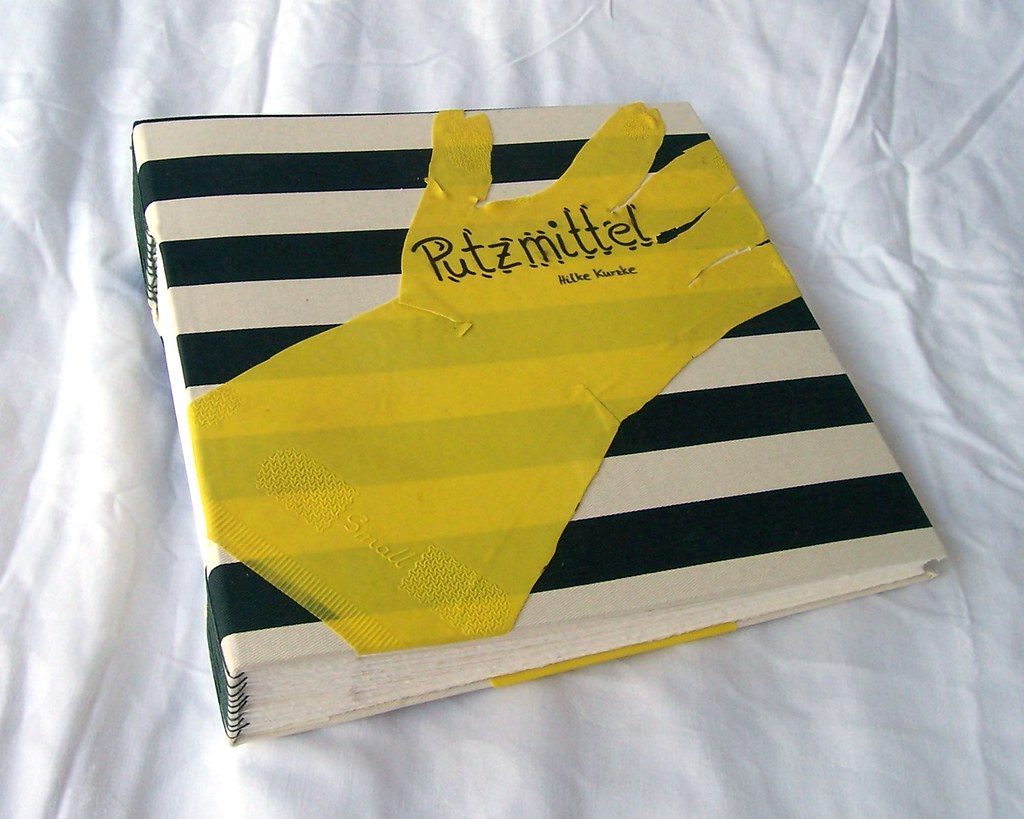
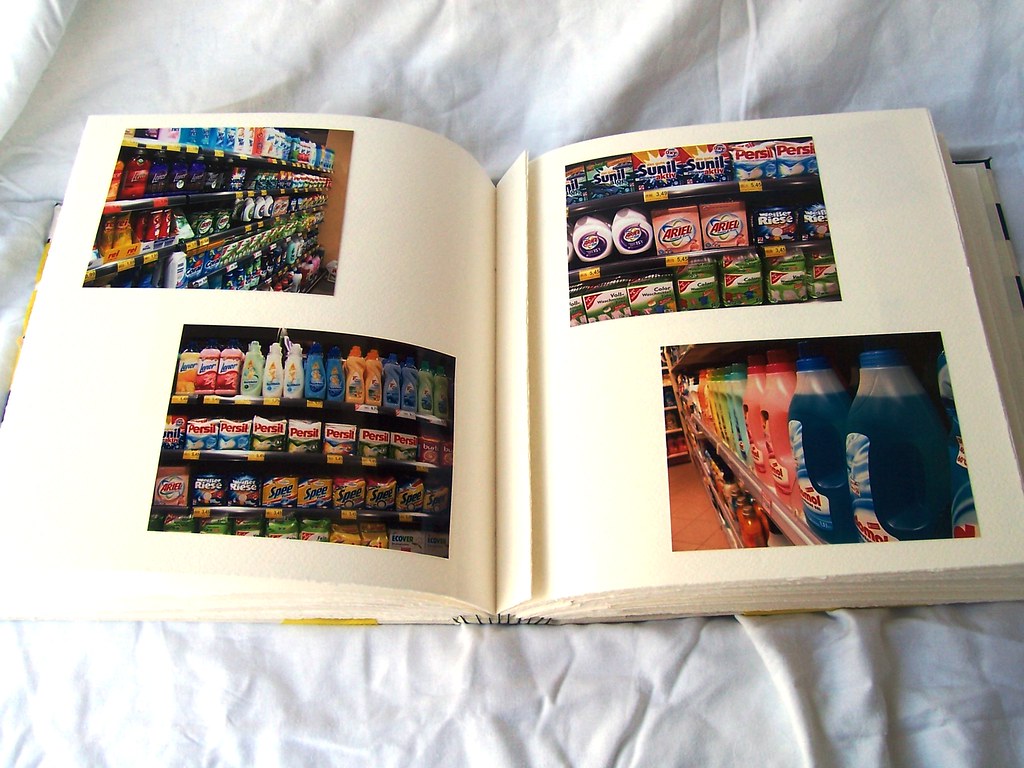
It is called "Putzmittel" which German and means cleaning agent. It is a photo album and contains photos of Putzmittel available here in supermarkets. I went through there and shot photos.
There are several things I like about the book: I think it is good and sound as a book. I like this way of making a photo album and already plan to make more. The signatures consist just of 2 sheets of watercolor paper and additionally 4 strips of watercolor paper to make room for the photos to be entered.
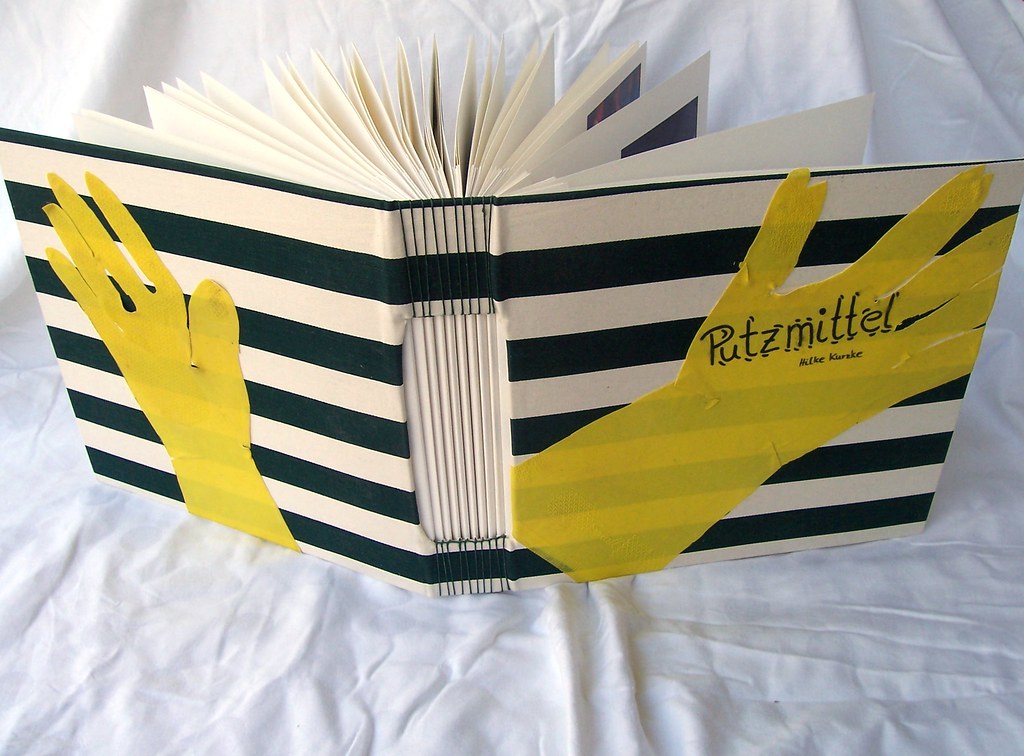
I like the idea to use these rubber gloves as decorative element. This was meant to be the unconventional ingredient to this book. I was thinking about chicken feet leather and the like, and thought I could modify the idea a bit to make it work.
But then it wasn't so easy to cut up the glove right, and it doesn't really stick to the cover at the edges (that's because the material is not flat to start with and the tension this causes builts up at the edges). Also the pen didn't quite stick to the glove and is slightly smeared. And I started with too few photos, so I had to take more. Which I did. But now I would need to search through them, decide which ones to get printed on photo paper, add them. To Arrange everything into the chapters as initially inteded will be hard. - I'd just have to make it again, and I am lacking the energy and time to do so right now. And overmore - it is rather big and heavy; I decided too heavy to be send across the ocean.
Now I just hope I took the right decision and Jackie likes the book I am sending her. I'll show it off once it has reached her - I don't want to spoil the surprise!
Thanks for reading and have a nice start into the new week!
Above you see the book "alien". It is an ordinary Coptic bound book but has earplugs on the covers.
I like the idea to use these rubber gloves as decorative element. This was meant to be the unconventional ingredient to this book. I was thinking about chicken feet leather and the like, and thought I could modify the idea a bit to make it work.
But then it wasn't so easy to cut up the glove right, and it doesn't really stick to the cover at the edges (that's because the material is not flat to start with and the tension this causes builts up at the edges). Also the pen didn't quite stick to the glove and is slightly smeared. And I started with too few photos, so I had to take more. Which I did. But now I would need to search through them, decide which ones to get printed on photo paper, add them. To Arrange everything into the chapters as initially inteded will be hard. - I'd just have to make it again, and I am lacking the energy and time to do so right now. And overmore - it is rather big and heavy; I decided too heavy to be send across the ocean.
Thanks for reading and have a nice start into the new week!
Saturday, May 23, 2009
Webdesign

I mentioned already that I am occupied with webdesign at the moment. I am renting my own domain and will set up a homepage and also my blog there in near future. Of course I'll give you all the links in great detail once everything is set up. At the moment all this is still one big construction site. Alone yesterday I created more than 30 images like the one above and below. They are meant to serve as background for web pages, I designed banners and background for navigation panels and what not. Until now I have not come up with something I am truly satisfied with. Either I find them too boring, or I think the background attracts to much attention, or reading the text on the background is to hard, ...
 I just posted this to give you a sign of life - I am not gone and will be back soon!
In the short times while my computer is loading or calculating stuff I managed to finish some more Mini Ritter Sport booklets. Furthermore I finished some more fancy books one of which will be entered in the book swap at the book arts forum. Once I have decided which one of them I'll give away I will show you pictures of those that will remain with me. And once this is all done, and I cleaned out and put up my new book press, I should have new books and methods and tutorials to present to you.
Thanks for reading, have a nice weekend!
Wednesday, May 20, 2009
Tagged: 7 Favorites
 That's my lunch today: Strawberries with buttermilk. - I don't have new bookish pictures to share today.The past few days I was all occupied with other stuff (mainly web-designing, but that's a different story and will be told another time). A good opportunity to pick up the tag that I received last week from The Spotted Sparrow - thanks for thinking of me!
So apparently now I have to name seven of my favorite things and seven of my favorite blogs. Mhm, let me think... I'll change that into my favorite things to do at the moment:
- making, reading, buying, and looking at books
- sitting in the sun with an ice-coffee in my hands (cold coffee with vanilla ice cream inside and wipped cream on top)
- meeting with friends for a beer at nights, or in the afternoon for a nice tea and cake, or just like that without eating or drinking
- eating (all kinds of good stuff , especially baklava, dim sum and sushi)
- playing blob on the wii
- playing other board or computer games
- sketching
- About the Binding - A blog dedicated to fine bindings. The author gives us an unusually deep insight into her way of working.
- Studio 5 Book Arts - Also a book binder interested in fine bindings, less traditional than the first and more into arts
- Shakled in Bookspace - (Maybe I have linked to this blog before - I can't remember clearly.) I was first drawn to the blog by its fabulous title. The writer is a book binder, sometimes he'll show pictures of his own work, but this is not the primary focus of this blog. Most of the time you can read his thoughts that are work related - and I like his sparce and dry comments.
- With Green Chair Press we slowly turn from book binders to print makers - probably you all know this blog and I don't have to say much about it. The author sometimes presents her work on this blog, some of which are actually books, but she also comments on recent developments in the world of print and books, webfinds, and the like.
- Minus Five - Best go and have a look yourself. I don't know how to describe this New York based designer in just a few words
- Amanda Watson-Will - an artist and crafter. At the moment occupied with printing. I like that she's sharing her experiments and unusual approaches.
- And at last something that as rather few connection to books: Indexed - a fun blog with comments on life and society in the form of graphs.
Monday, May 18, 2009
My First Time at a Bookbinding Workshop
 The last two Saturdays I spent with Nina Judin, who taught to two others and me a Coptic binding with headbands. Her workshop is located in a souterrain flat in the center of Amsterdam. It was rather cool down there, taking away the heat of my overexcited days in a pleasant way. Although it was half way in the cellar, it had enough light, coming from two direction - through windows at the front and on the back facing a patio. The whole atmosphere was so relaxing... Thinking back her studio seems like an island of peace in the last weeks. I had been stressed for days, working too hurriedly, always with my eyes not on my work in front of me but on the huge stack of work still to be done. Going there was like stepping out of it all.
 A week before the course I booked my trip to Amsterdam. - And was shocked to learn that on Saturday mornings trains to Amsterdam don't take 3 hours like on almost every other day and time but 5. The workshop started at 10.30 a.m., I should reach the station at least half an hour earlier to this,... I seriously thought of bailing out - and I am so glad that I didn't!
This was going to be the first time for me to learn, not from a book, or by trial and error, but from another person. In the description it said this was a course suitable for beginners. So I thought that, since I had already some practice in (Coptic) binding books, I wouldn't learn much on the technical aspects of binding books, and expected to learn mainly how to give a good bookbinding course. At the same time I was rather nervous, expecting from myself to deliver a perfect book in these two days. But with both assumptions I was completely and utterly wrong. I learned so much these days, in every aspect and mostly about binding books! I made a book that was in no way perfect. My struggle to do so is just another indication for the stress I am feeling at the moment and that I am mostly putting on me myself. Another indicator for my momentary restlessness was the speed with which I was working hurriedly and unfocused. Although I realized it, I just couldn't turn it off - at least not during the first session last week.
I heard people saying before that they learn many small details on workshops, but only now I realize how true this is. I want to share the most important idea for me: this makeshift construction of a thin awl:
 It is just a bookbinding needle attached to the handle of an x-acto knife (or hobby knife). Of course I have bookbinding awls here. But they really are too thick to use them for punching holes in paper for binding. I had tried different methods for punching holes into sections before, but this is really the best way I have seen so far to do it.
I don't even want to try to give a complete recount of all the things I learned; it started with the most basic things, really. The following picture shows a detail of how the stitching looks like on the Coptic bound books I usually make:
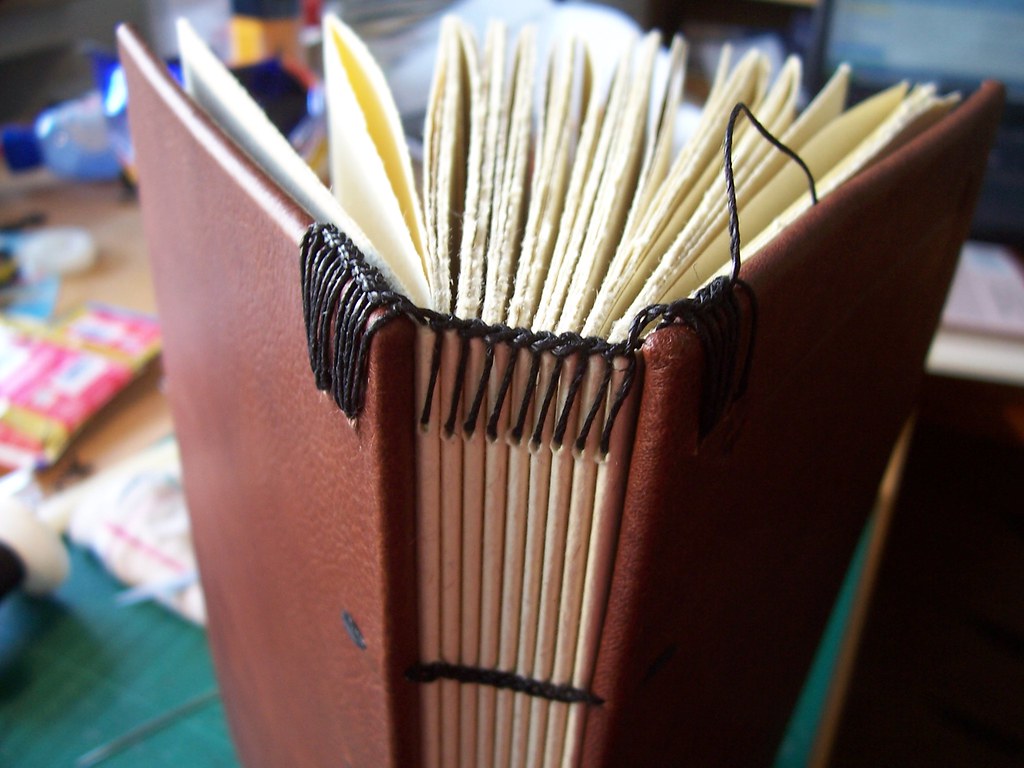
 And this is a detail of the stitching we made at the workshop:
I hope this is visible - the black thread makes it harder to see... Both books are bound in a 2-needle style. But at the book on top the thread only loops around the previous section, and on the other pictures you can see thread that loops around and then it tugged under itself.
I can't say often enough how much I enjoyed the whole experience and atmosphere. If you can arrange it, try a workshop with Nina Judin yourself. And if you can't make it to Amsterdam, maybe you want to have a look at her boks online.
And also have a look and see what Dymphie wrote about our workshop here.
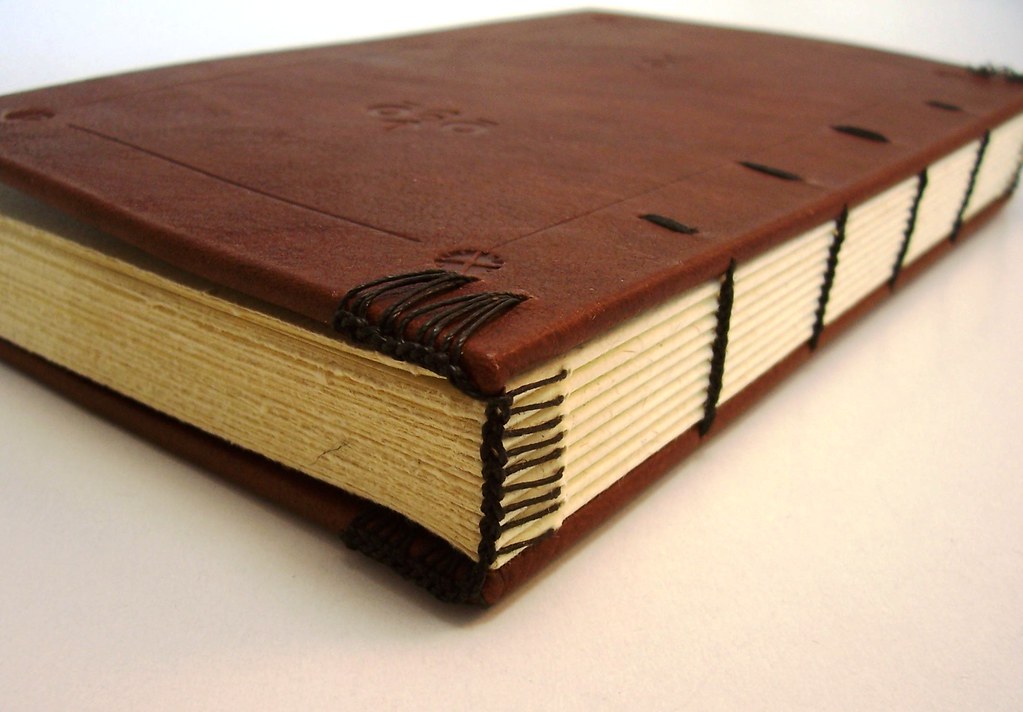
Below you see the three books we pupils made, the one lying in front of the others is mine.

Good bye for today and thank you for reading!
Edit: You can see the ends of the thread for the headbands still hanging around in the photos above because I intended to make them new and again because I was so dissatisfied with them. Now I am finished with this and can show you some more pictures of my book:
Friday, May 15, 2009
Gripped by the Mini Book Frenzy - Again
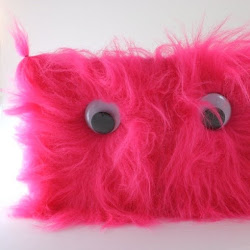
 In the photo above you see the new and improved third generation of Ritter Sport Mini books. The Siam paper worked well (I talked about my intent to try it here) and I am going to make several of these - you'll see them again. I actually finished the chocolate book yesterday, and today I was bitten by the mini book bug (again), and I am going to talk about the teeny tiny books in the front.
Instead of throwing them away I folded the scraps from cutting the paper for the ritter sport mini into signatures and bound them to a book block with the dimensions: 1.2cm x 1cm x 0.6cm, about 1/2 " x 2/5" x 1/5"
 This was the first book block.
 The first book block in the "finishing press" - glueing the spine.
 still in the press with glued on head bands and a marker ribbon. I had to cut away a big chunk of the band to which the head bands are attached, but they still look huge on this tiny spine :-)
 Here I am "trying on" the the raw cover. I like to make the covers too large (also on usual sized books) and only cut them to size after checking the fit of the text block.
I thought the covers had too much space to the spine, but was deceived by the small size.
 First cover
  parsed a tiny scrap of leather for the spine. Which was a hell of y job, since I lack the knowledge, experience and skill to do so (and I was using a kitchen knife). Then I covered the cover, glued in the book - first one done.
 With the headbands the book was a tack too high for its cover. - It must be possible to do better...
 Second book block done - looks better!
 Thinned another piece of leather for the book. this time a bigger one, because I wanted it all in leather. Results: Fingers hurting, holes in the leather, but - a piece in the middle of it would be big enough to cover my teeny tiny mini book. But just even so, it could get a bit tight in the end. And so I punched with a hole punch
the frayed holes to nice round eylets. Added some more, too. Glued the leather to the blue Lokta paper I was also using for endsheets on the book block.
And then, I had the weirdest idea of all - hand sewn headbands. - It is a leather volume, right? So nice headbands are a must:
 Sorry for the blurred picture, the spot was too small for my automatic focus to catch it... Anyway, this is the first headband done. In the instructions it says: "Be careful not to cut through your thread, when cutting the core to size." I though: Who would be so stupid to cut the thread? And the answer followed immediately: Me:
 So, back to work. Here's the first headband done:
 And here's the second:
 And this time it turned out well enough, so that I have made the photo above click enlargable (I mean: Click to enlarge!).
In the meantime I covered the cover and: Voilá the second micro book done:
 Unfortunately I notice now that the books don't open well - the spaces at between spine and cover are way too small. I should have know from experience that one doesn't scale everything down when working small.
But I am resisting the urge to try a third one.
 This was kind of a mad project. (See some more picture on Flickr.)
Have to get back to serious work.
Thanks for reading!
Wednesday, May 13, 2009
No books today

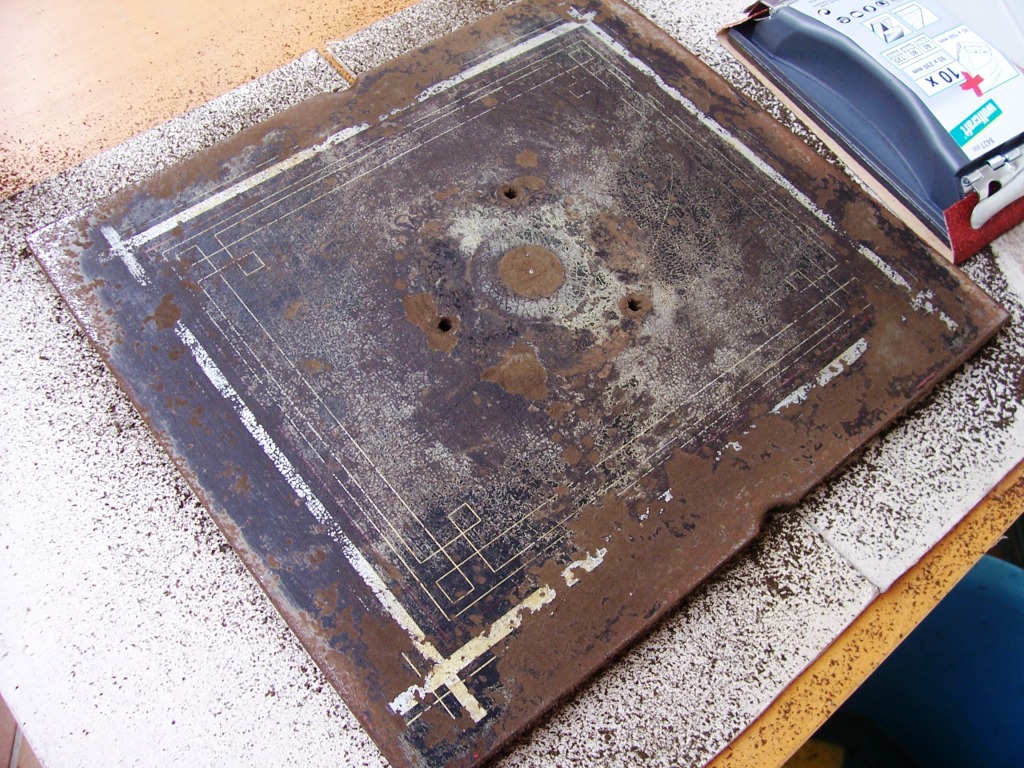
Several weeks ago I bought this press that you can see in the picture above. I was a little scared to start to work on it. I had read a lot of different and contradicting hints on how to prepare it for use. And I understood only half of it, because there were so many product names in it that are not known here.
However, yesterday I dared to start to work on it. First, I took the upper plate off the press. There was rust also between the lower and upper plate and I have no idea how I should clean it without removing this first.
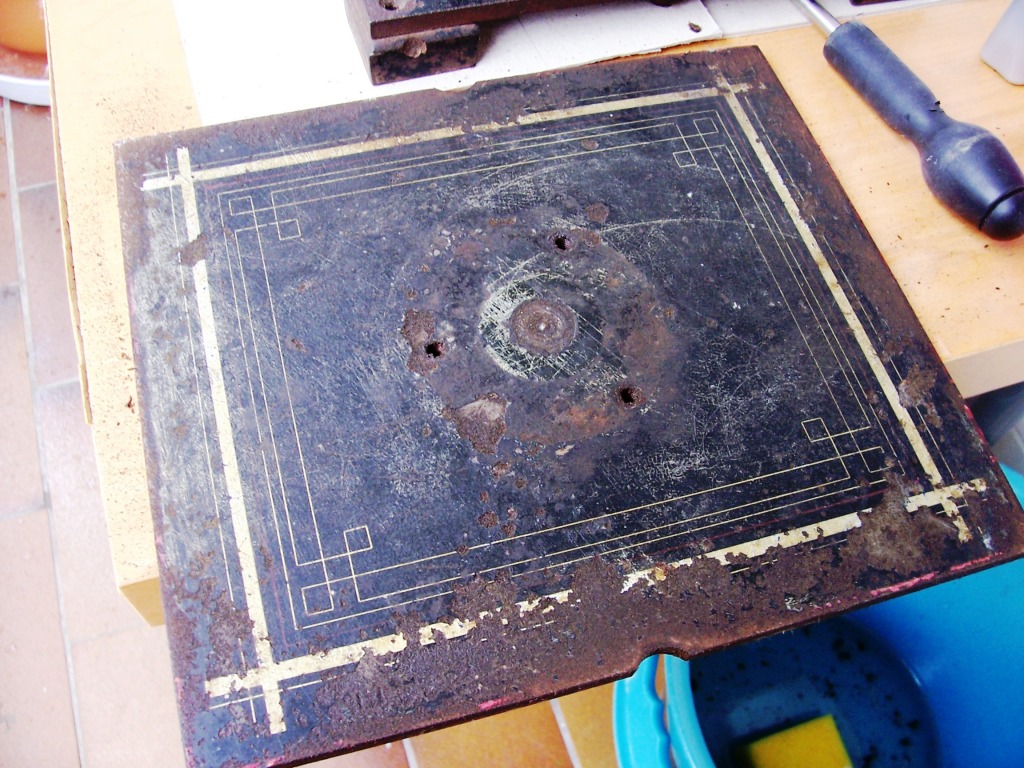
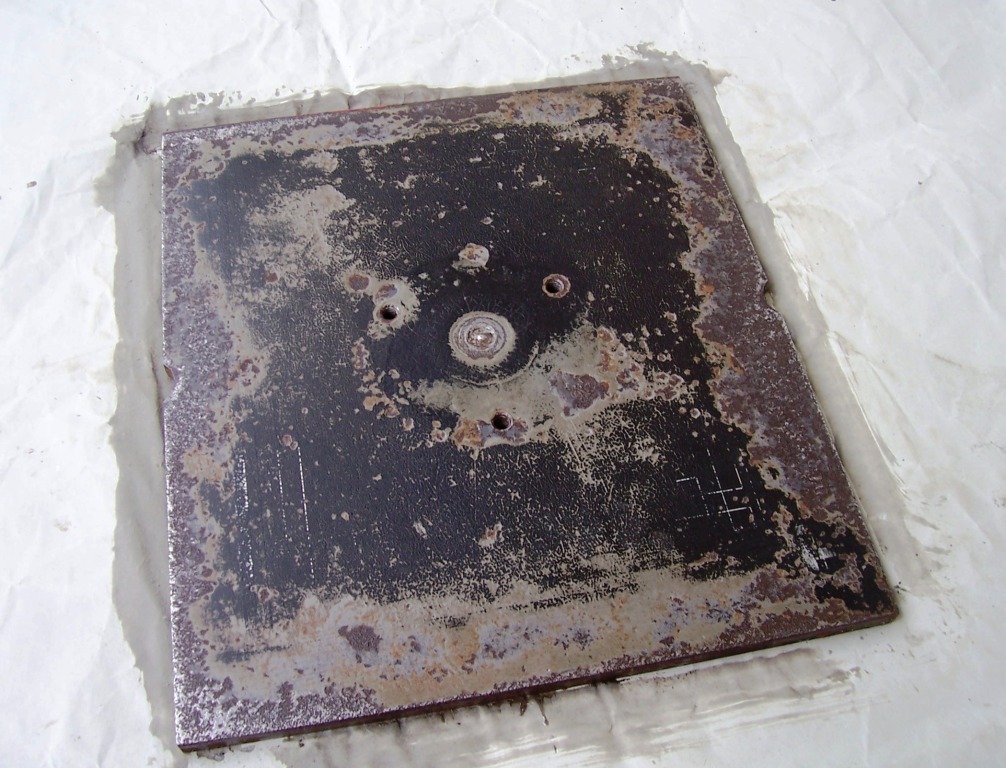
The paint only came off reluctantly and underneath more rust was hidden.
So I bought a set of wire brushes that can be attached to the electric drill machine. It took me a while to understand, how to use these new tools. In the beginning I used to few strength from my arms, and to much speed of the machine. I understood quickly that I need to push the brush onto the plate harder, but it took me half an hour or so to understand that it was rotating to quickly. This is how the plate looked like after half an hour working with the wire brush (visible next to the plate on the right):
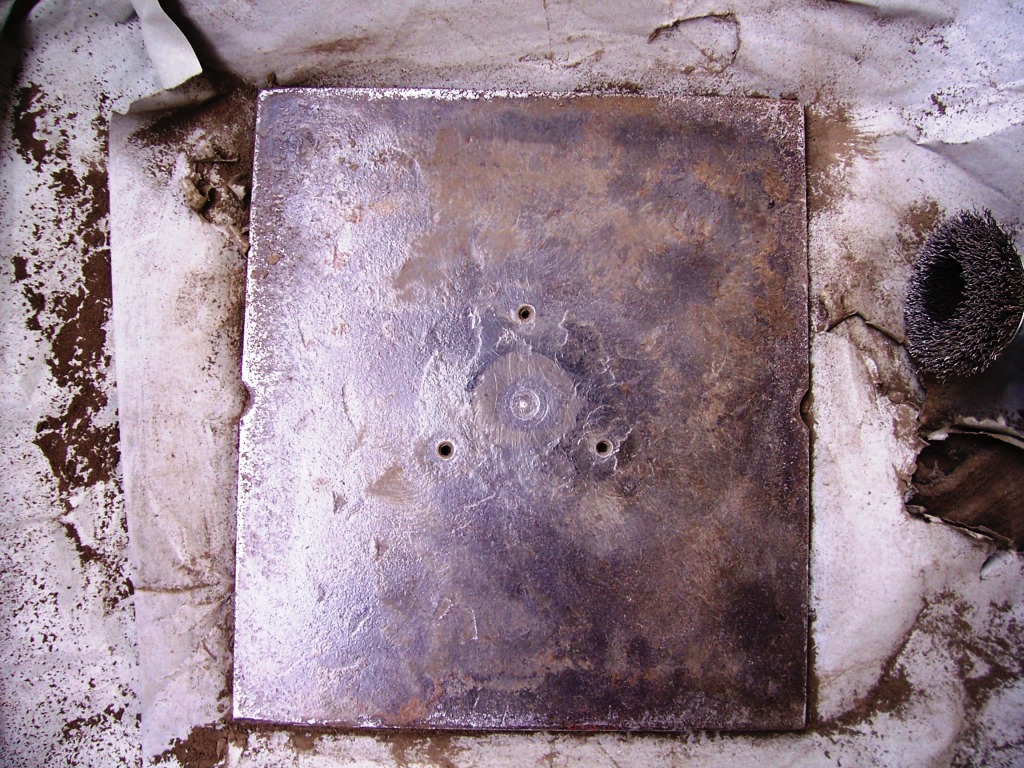
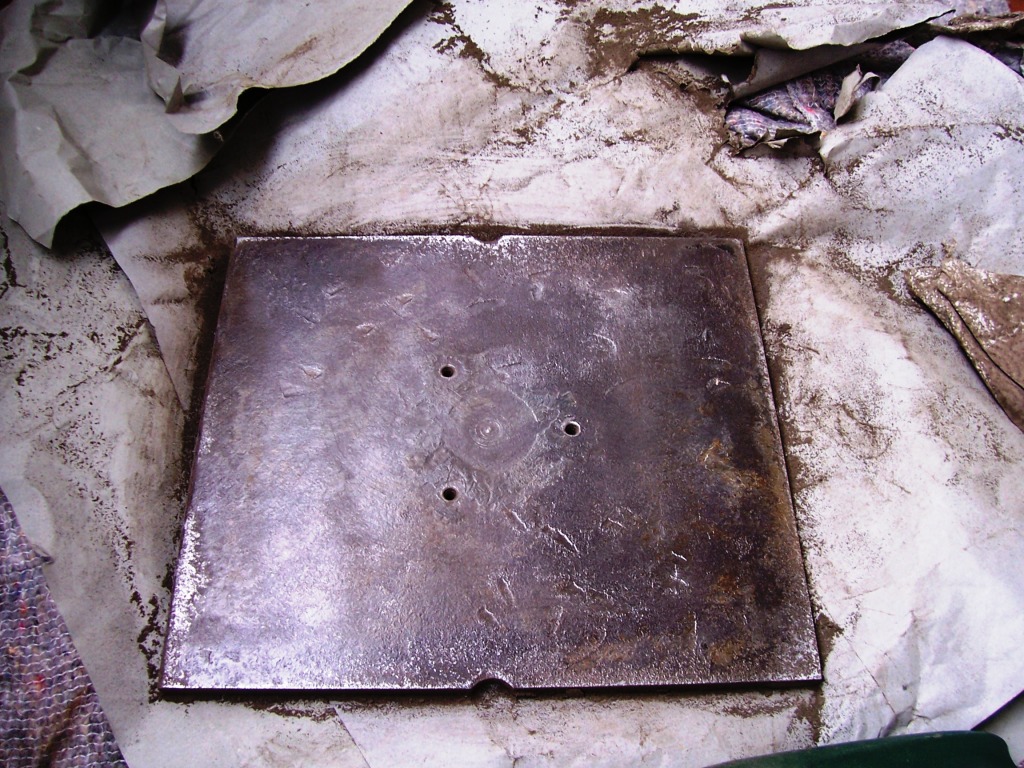
What's encouraging about working with the power tool is that all work seems to have at least some effect. With the sandpaper it didn't feel like I was going anywhere. Probably I could get the plate even smoother and remove the last bit of the old primer and rust.
But not today: My arms are (not unpleasantly) weak from pressing the brush against the iron plate and my hands just can't hold the drill anymore (I have some difficulty typing on my computer, actually). I'll have to continue tomorrow.
Since I already worked yesterday on the press, and today again - no books to show off today.
Thanks for reading!
Tuesday, May 12, 2009
Ritter Sport Mini Books - continued
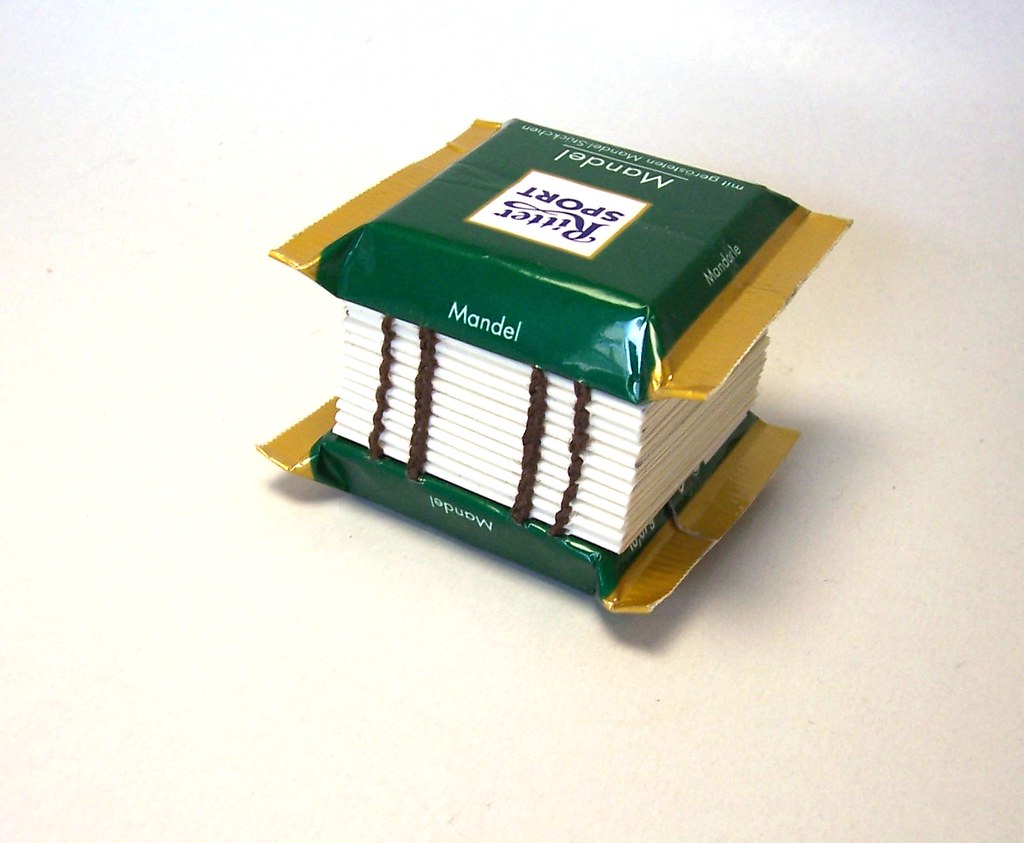
 It has been while now since I cut and sanded down cardboard/wooden chocolate pieces. I wrote an entry here about it. The initial plan was to integrate my own chocolates recipes in the booklets. But I did not seem to be able to set the text in a pleasing way. That lead to me discarding the idea altogether. But I still had all these 'chocolates' and thus decided to make a new (third) batch of the blank Ritter Sport Mini Books that I made last year.
Over the time some problems with these first and second batch became apparent:
 If you take a close look (click on the image for an enlarged image) you can see that the thread tears out of the chocolate foil. This is because a) the thread only loops around the thread on a earlier signature without locking - I can do this better by now, and b) the reinforcement I used for the foil (filmoplast) was insufficient.
 There are more problems. I had the books on display and all but one of them are ripped. People tend to squeeze and pinch the package in trying to determine whether there is still chocolate in the covers and the foil does not stand this strain. Again I figured, I need to strengthen the foil in some way.
And yet another problem was that the covers opened every now and then at the seams. I had used double sided tape to close them and one could easily push it back together, but still I found this very dissatisfactory. So this time I wanted to do better.
 I made this much better models of the chocolate so that it should feel much more like chocolate than with the initial books. I glued the foil to a piece of paper before further proceeding with the binding. And I improved the binding itself. The result can be seen on top, right next to one of the second generation - very ugly. I thought it would be good to have the pages not the size of the chocolate but of the covers. Now I see that this was a bad decision. Also I made the signatures thicker, so that the bulk at the binding should be less. O.k., the bulk was less, but the finished product looks so much less than a mini book! And finally, the paper on the back of the foil makes it a lot sturdier - but you can no longer feel the fake-chocolate inside. I could just as well not have shaped them at all, but simply put a piece of wood inside.
So I'll take this apart again. I think I'll go for the small pages, and sewing station like in the first generation (the pink book). I'll glue paper to the foil, but I'll try a very thin Siam paper (5g per square meter) instead of the office paper (80g per square meter) that I used for the first.
I hope this will work better.
I'll let you know when there are new developments...
Thanks for reading!
Friday, May 8, 2009
Still only experiments
 Finally I am back in my studio. As I said before, I feel a bit threatened by the craft fair I'm going to do in August. So I turned to the more crafty and less artistic side of things. Today I shopped for more cloth and will start to make some photo albums in near future.
But mainly I have had too much paper work to do - forms to fill out, contracts to terminate and to conclude... And the bad thing was that, as an answer to a growing pressure with deadlines for boring stuff, I canceled my free studio time. Which made me feel bad and perform even worse. But today I granted myself about an hour free time and I can feel the wheel turning again. Sure I will soon be on top of things again. Don't know whether this will end up as a project. At the moment I think it will. But I don't want to press it yet. It's important for me to stay patient with myself and continue the work with as few pressure as I can muster.

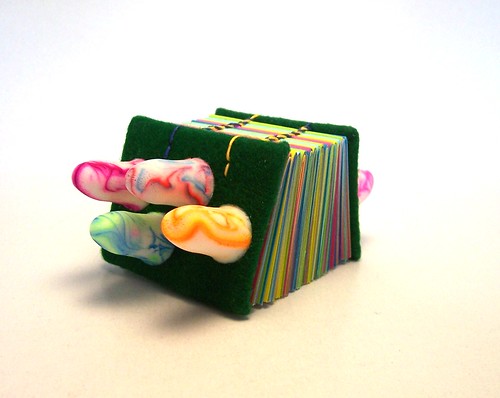
This little book object is about 3 cm high, 2cm wide. The pages cannot be moved at all. It is fixed like you see it. Neither can the pages be turned, nor could you change the angle at the spine. Also the one page that seems to be loose on the top picture is absolutely firm. You can't turn it without breaking it. The photo below shows the picture that I cut to pieces and made into the booklet:

Tuesday, May 5, 2009
Linocut with traditional linoleum
 Mhm, bis jetzt hat sich noch niemand beschwert, dass ich ganz auf die Englische Sprache umgeschwungen bin. Ich fände es schade, wenn ich dadurch Leser verlieren würde. Eigentlich denke ich die meiste Zeit über Buchbinden in einem Kauderwelsch von Englisch und Deutsch nach, in dem ich am liebsten auch schreiben würde - aber das würde dann wahrscheinlich gar keiner mehr verstehen. Mal schauen, was ich auf Dauer so mache, heute aber mal wieder Englisch. Wenn euch Dinge näher interessieren, die ihr aber nicht (richtig) versteht, gerne nochmal nachfragen!
Yesterday I cut and stamped these new labels. And I took the time to show you the process.
 This is how traditional linoleum looks like. According to my knowledge it is available under the name artist's lino in art supply stores. Its advantage compared to the soft lino that I was reviewing before is that is is firm and slightly brittle. This makes is possible to work out finer details. (If you need to go even more detailed you have to switch to harder materials, for example wood.)
The first thing to do is to sand the surface a bit to rub off some of the really hard finish on which it is very easy to slip with the carving knife. In the following picture you see at the left the (not yet completely) sanded lino.
 When the lino is evenly sanded and cleaned, I painted them with thinned white water color:
 Let it completely dry. - This shouldn't take long and afterwards it looks like this:
 The advantage of the whitened surface is that it is easier to see the pencil marks:
 You can now directly sketch on the lino with a soft pencil. Don't use sharpened pencils, because their pressure could already effect your prints. If something is not to your liking, you can try to rub it of with a usual rubber or simply wash the pencil marks off with a damp cloth - then you may want to apply white paint again.
There are also techniques to transfer images that you happen to have already onto the lino. You could for example trace an image printed on a sheet of paper with a soft pencil, and then rub it then onto the whitened lino. Then you get a mirror image of course!
Once you have your image on the lino, you start cutting away everything that you want 'white' in your print. (White means in this case the area where you don't want to print.)
A general warning: Remember to cut away from your body and fingers all the time!
You start by tracing all areas with a contour knife. In this case I simply used an exacto knife for this task. Generally you want a sharp knife with a blade not too flexible. Hold it as a slight angle away from the area that will remain on the lino, so that the edges of an area don't break off while printing:
 Very fine details like very thin areas between two areas may already be removed that way. Then you take the V-shaped cutting tool and take away more lino. Again I trace the areas first and then take away more of the small areas. I can't mention this often enough: Always push the knife in a direction away from your body and fingers! The tools are very sharp. You will definitely slip at one time and you don't want to risk cutting away fingers or stabbing yourself. Instead of turning the knife (possibly towards your body or fingers) rather turn the lino when cutting around corners.
 You don't need to cut very deep, essentially you only need to scratch the surface. Depth is needed to make the coloring of the plate easier. But already a slight dent in the surface will show in the print. So be careful where you rest your knife and how you store your linoleum.
The deeper you cut the more strength you will need, and the more strength you apply the more likely your knife will slip and ruin your work.
 Here I am finished with the V-shaped knife and take the U-shaped tool in my hand. With the U-shaped tool it's easier to cut shallow and take away larger areas. I started taking away the interior. I generally like to start with the areas where I have to concentrate more (i.e. slipping is really bad) and pass on to those where I have to concentrate less.
 Now I cut around the motif, inside the area where I already took away some lino. When bend the lino will easily break, and then you can use ordinary scissors to cut through the jute on the back to cut out the printing block.
 Before you start printing, wash away the white paint!
The printing itself is the same as I have already described it when printing the smiley oracle. In this case you'll probably won't need soap for the paint (another advantage of sanding the lino). Another advantage of this traditional linoleum compared to the soft lino is that you can print with oil based colors (if you think this is an advantage, there are pros and cons regarding the choice of paint).

 Afterwards you may want to take care of your tools. I am using oil stones to sharpen my cutting tools. They look like this:
 In my set are 4 different stones,
  Since it was already sharpened, you just have to have a close look at it to figure out the right angle in which to rub it on the stone. Rub both arms of the V back and forth in the correct angle - maybe ten times. You should have so much oil on your stone that you have a thin film of it on top that you push around with your blade. If you click on the picture you can see it. You do this on all four stone - and your tool is sharp again. Oil the blade lightly, wipe off any excess and store you tool.
Now we take care of the U-shaped knife:
 Again you should be able to see the correct angle because it was already sharpened. This time you don't push it back and forth, but sideways, turning the knife around. Also go from the roughest to the smoothest stone, wipe off excess oil and store your tool.
In either case you don't need any strength here. You should rub the blades lightly, just so that you get a faint sound. Don't press too hard. If you feel your knife is rather getting dull than sharp, you are using the wrong angle. Just start over again and don't be afraid to try again. It needs some exercise before your wrist knows how to hold and to turn the knives.
Now have fun trying it yourself, don't hesitate to ask further questions. On the left bar you can see the tag 'techniques: linoleum', click it to read related posts.
Thanks for reading!
Subscribe to:
Posts (Atom)