Thursday, October 30, 2008

Lion Journals 3+4, Paste Paper

Das sind meine Tagebücher 3 und 4 mit Löwenmotiv. Eigentlich habe ich noch zumindest Nummer 5 geplant, aber das wird erstmal warten müssen, weil ich andere wichtige Dinge zuerst erledigen will.
Beide Bücher haben einen Verschluss, der mit Mageneten funktioniert. Das war für mich das erste Mal, dass ich mit Magneten gearbeitet habe - hat viel Spaß gemacht und funktioniert einwandfrei.

Above you see the lion journals No 3 and 4. Both have a magnetic closure, but the blue journal has more extra details:
The pages got a hot pink rim, the endpapers are sewed on and are decorated with lion foot prints.

Für das blaue Tagebuch habe ich die Kanten aller Seiten per Hand mit Schwamm und Kleisterfarbe gefärbt.
Überhaupt ist das blaue Tagebuch etwas aufwändiger: Die Vorsatzlage ist angenäht und das pinke Tonpapier aus dem sie bestehen ist zusätzlich mit dem Löwentatzenstempel verziert worden.
Für das grüne wollte ich insgesamt einen etwas abgenutzteren Look. Deswegen habe ich mit anderer Farbe auf das Cover gestemelt, die eigentlich nicht so gut geeignet ist. Hier ist die Vorsatzlage aus schlichtem, cremefarbenen Hahnemühle Vorsatzpaper und nicht weiter verziert. Der Textblock beider Bücher besteht aus Silberburg Bütten, ein Papier ganz aus Baumwolle. Das erste Mal, als ich das in der Hand hatte, war ich ganz beeindruckt: Man merkt schon, dass das aus Baumwolle und nicht aus Holz gemacht ist. Das Papier ist relativ dick, ist aber geschmeidiger und hat eine weichere Oberfläche als Holzpapier.

The green journal has plain white pages and no additional decoration of endpapers or anywhere else. The pages of both journals are of handmade rag paper with a very pleasing texture. - Now I just hope my customer will like them as much I as do. (The plan is that he picks one of the four - the rest will be for sale when I start my business at November 17.)


And now for something completely different:

This is the stack of paste paper I made two days ago. They are dry by now, and for the next few days they will be pressed, so that they lie down flat. I really like the tone of the green acrylic paint that you can see there on some of the papers. It is of the Galeria series of Winsor & Newton and the tone is called Hooker's Green. - That perplexed me.... - but no, I don't think that me liking the color says anything about me! ;-) What a strange name for a color!

I wondered in my last post whether I can use
a stamp that I cut from stamping material for decoration the paste paper - it worked, but not as good as one may wish. Below you can see the results.

Das oben ist der Stapel Kleisterpapier, den ich vorgestern gemacht habe. Die Blätter haben bis heute morgen einfach nur rumgelegen und sind dabei getrocknet - und ziemlich zusammengerollt. Für die nächsten paar Tage werden sie zwischen Finnpappe, Papier und Bretter und unter Gewichte gelegt und werden dann wieder schön flach.
Das Experiment mit dem Stempel hat übrigens einigermaßen geklappt. Der Kleister verschmiert beim Andrücken natürlich ganz schön und muss dann irgendwo hin - deshalb bräuchte man tiefere Ritzen und Löcher zwischen den Stellen, an denen man den Kleister verdrängen will. Ich habe nach jedem Eindrücken den Stempel wieder gründliche gesäubert, das musste ziemlich schnell gehen, damit der Kleister auf dem Papier nicht schon antrockent - ganz schön viel Hektik. Deshalb werde ich das so nicht wiederholen. Vielleicht kaufe ich mir auf dem Weihnachtsmarkt ein paar Modeln für Blaudruck - mal schauen, ob das besser geht. Unten seht ihr nochmal zwei Bilder von Papier mit dem Blumenstempel. Einmal ohne Farbe auf dem Stempel - er funktioniert dann nur durch Verdrängung und einmal mit extra Farbe:
Above the stamp was used without extra color: When I press it into the paste, I displace it under the raised pieces of the stamp. Below I used the stamp with extra black paint on it (this was really black color, not black paste, and I pressed it into the still wet yellow paste - you can see both effects: the color and the displacement of the yellow paste.

Tuesday, October 28, 2008

Lion Journal No 2

My creative work is still going - or rather crawling - slowly. I have not yet completely recovered from my cold, and I have a slight temperature again since yesterday. I just hate this condition when I am too healthy to just lie down, but sick enough to be easily exhausted and simply slow.
Above you see the stamp I cut today, I am planning to do some paste papers today, and I will try whether I can use the stamp for that. Usually one would use stamps from brass or hard wood for that purpose, but I'll give it a try.


I finished my second lion journal already on Sunday evening:This is not the lion lino cut I made before, but a new stamp I carved sometime during the last week. Below you can see it in more detail.
Das ist mein zweites Löwennotizbuch. Es sind einige mehr geplant, aber heute mache ich erstmal ein bisschen Kleisterpapier.

Es tut mir leid, dass ich nicht viel vorzeigen kann, vielleicht habt ihr ja Lust, wo anders weiterzulesen:

Diese Homepage von Susan Porteous ist sehr schön gemacht und man kann dort sehr beeindruckende Buchkunst anschauen.
Ein bisschen mehr zu Lesen aber auch vor allem anzuschauen gibt es bei Dark Roasted Blend, in diesem Falle über Altered Books.
Wenn ihr Spanish lesen könnt, dann empfehle ich die Lektüre dieses Artikels bei Libro de Artista. Er enthält viele schlaue Gedanken zu der Entstehung einer neuen Kunstform, die wie BookArt kennen (nicht 'Buchkunst' wie sie etwa in Leipzig gelehrt wird; das ist eher ein Vorgänger) und zeichnet die sich daraus ergebene Vielfalt nach und versucht eine Klassifikation. Ein wirklich gelungener Artikel!
Und mit den Empfehlungen verabschiede ich mich!


Sorry I have so few to show to you today. Maybe you have a look at the following websites instead:
The Homepage of Susan Porteous is well made and you can see a lot of impressive and beautiful book art there.
A collection of pictures of altered books can be found at this article at Dark Roasted Blend.
And if you still don't have enough and you can read Spanish, I want to recommend this article at el libro de artista. It talks about the history of artists books and attempts to give an impression of the wide variety and distictions between them.

Thanks for reading and have a nice week!

Friday, October 24, 2008

Wochenrückblick

Another week flew by without me being overly productive. Well I caught a cold in the middle of the week so this will be my excuse for not having much to show to you. The booklet 'evolution' that I was already talking about is finally finished. - I started the project in August, so it took me almost three months to finish it. The frustrating thing about that is that I don't really like it anymore, at least I don't like it enough to show pictures of it. And I will definitively not hand it in at the competition I designed it for. Well, at least it is finally finished! Next time when I start to create something especially for a competition I will hopefully think of this totally awful experience. Oh, and on the left you see a matchbook that I call McGyver booklet - it is made from what I had at hand: a orange mail notification card, some scraps of paper, a piece of string, a few scraps of cardboard and adhesive tape.

Was habe ich in der letzten Woche gemacht? Das Büchlein 'Evolution' ist fertig geworden, aber ich bin ziemlich unzufrieden damit, also werde ich keine Bilder davon vorstellen. Vielleicht nächstes Jahr im Rückblick, wenn ich über mich lachen und sagen kann: Schaut euch an, welch merkwürdiges Zeug ich damals produziert habe. Ich hoffe, das wird mir eine Lehre sein, nicht zu früh von Projekten zu erzählen.
Mitte der Woche habe ich eine leichte Mandelentzündung bekommen und war den Rest der Woche mit kurieren beschäftigt. - Das soll mir heute als (vielleicht etwas billige) Entschuldigung dienen, dass ich nicht allzu viel fertig bekommen habe. Das da oben ist die versprochene Streichholzversion einer Buttonhole Bindung. Ich nenne es McGyver Buch, weil es mit Klebeband gemacht ist. Die Streichholzschachtel habe ich auch mit rotem Isolierband beklebt.

Ich habe ansonsten vor allem eine Menge weiterer Schnitte gemacht und mit dem Druck in mehreren Farben experimentiert. Wirklich zufrieden bin ich aber auch da mit keinem - also auch davon erstmal keine Bilder. - Ein nur etwas komplizierterer Druck in mehreren Farben erfordert erfordert gleich sehr viel mehr Planung, und ich brauche noch eine Menge Erfahrung, bevor ich weiß, was ich eigentlich in welcher Farbe haben will, und wieviel ich in welchem Schritt drucken will.

Heute Mittag lag bei mir endlich das Softlino im Briefkasten, das mir Merle vom BookArtsForum geschickt hat! - Danke nocheinmal dafür. Ich freue mich schon auf die ersten Experimente und werde euch auf dem Laufenden darüber halten, wie es so funktioniert. Es ist jedenfalls vom ersten Eindruck her viel fester und spröder als das Stempelgummizeug - und ich hoffe letztendlich auch besser für meine Zwecke geeignet.

I have only made this one book since that micro booklet that I showed off in the last post. It is the first in a series of lion themed journals I am planning to do.

Don't see the lion theme? Have a look at the (front-) endpaper:
There are more lion footprints randomly distributed over the pages of the journal.

With the beginning of autumn it becomes increasingly difficult for me to make good pictures of my books. - I suppose I'll have to buy some lamps (and spot lights and bright white umbrellas ;-) ) Previously I made the pictures in a shadowy place outside, all I had to do is maybe wait until the light is right. But now it is too dark all day long. The lights I have inside my flat all seem either not bright enough or of the wrong color - all the pictures look grayish :-(. The covering paper is a really bright, fiery red, just barely not orange...


Most of my time this week I spent cutting stamps and lino. I tried some more lion stamps that you may get to see when I continue with lion journals. But mostly I was practicing to use more than one color in cuts that show nightly landscapes, which turned out more difficult than I first expected. I am not overly excited about my results and definitely not proud of them, so - no pictures to show to you. But today I received the soft lino pieces that Merle from the book arts forum sent to me. Thanks again, Merle! I am really looking forward to using them. Maybe I can show you more prints at the end of next week. And with a last picture of the lion journal I wish you a nice weekend!
Oben seht ihr das einzige Buch, das ich diese Woche fertig bekommen habe. Es ist das erste von mehreren Tagebüchern mit Löwen-Thematik, die ich gerade plane. Ich war von einem Kunden mit einem Tagebuch mit Löwenkopf beauftragt worden, und das Thema hat mich dann irgendwie gepackt. - Ich mag Katzen! Von außen ist es mit einem handgeschöpften Papier, das ich unter dem Namen Lederpapier gekauft habe, bezogen. Die Fotos sind leider etwas grau geworden, das Rot ist wirklich total knallig und gerade so nicht orange. Ich war überrascht, dass es auch aufgezogen so viel Struktur hat. Ich hatte eigentlich erwartet, dass es sich unter Leimeinfluss glättet. Ich hatte ursprünglich auch vor, den Löwenkopf nach außen zu drucken - das ging nun nicht mehr. Also ist er nach innen auf den Vorsatz gekommen. Ich bin mir nicht so sicher, wie gelungen ich das finde - mir gefällt der Löwe schon schwarz auf weiß besser als weiß auf schwarz. Im Buch sieht man auf einigen zufällig ausgewählten Seiten die Spuren eines Löwen - einige in schwarz, andere in blau. ( Ich habe extra nachgeschlagen, wie die aussehen; das Verhältnis von Tatzengröße und Schrittlänge entspricht hier einem Berglöwen ;-) )

Na, und damit verabschiede ich mich ins Wochenende! Vielleicht sehen wir uns ja morgen in Köln auf der Buchbindermesse.

Tuesday, October 21, 2008

Leder schärfen - ein neues Minibuch

Vor etwa 2 Wochen habe ich vuscor besucht und durfte mir ein paar Tricks bei ihm abschauen. Unter anderem hat er mir gezeigt, wie man Leder schärft, also sehr dünn macht, so dass man es zum Buchbinden benutzen kann. Na, und das habe ich heute mal ausprobiert. Und ich wäre nicht ich, wenn ich das nicht 1. an einem Rest ausprobieren und 2. ein Mini-Buch daraus binden würde.

I visited vuscor's studio about 2 weeks ago and he showed me how to par leather. So I tried that today...

Das Ganze fing damit an, dass ich ein Mini Longstich aus einigen kleinen Papier Restchen machen wollte, die im folgenden Foto auch mit im Bild sind. Aber die Lederreste, die ich noch vom ersten Lederbuch übrig hatte, waren für dieses Vorhaben zu dick - das Buch wäre nie und nimmer geschlossen geblieben, also fing ich an, das dünner zu machen, fand Gefallen daran, und machte es immer dünner...
In this picture you see the tiny signaturures (1 cm wide). Initially I wanted to par the leather just enough so that I can do a leather longstich. But then it was not as hard as I had though it would be, and I tried paring it down to zero. In the following picture you see on top another scrap of that leather and at the bottom the one I thinned:Etwa so dünn war es dann am Ende. Nach dem Foto war es noch nicht so gleichmäßig, wie ich mir das gedacht habe, und ich hab' das noch ein bisschen ausgleichen können, aber im Prinzip war's das. Nun fand ich es zu dünn für einen Longsticheinband. Also habe ich nur die vordere Spitze genommen (die ist auch dünnen als das breitere Stück weiter hinten, das ich vielleicht doch noch zu seinem ursprünglichen Zweck benutzen werde). Hier sieht man nochmal das Leder und das ganze Material, das ich runtergekratzt habe.In the picture above you see the pages, my knives (for paring I used the colorless one, which is only a sharpened kitchen knife) and all the material I scratched from the leather. Then I bound the pages and build the cover

Das ist der Bucheinband für das Büchlein. Leider hatte ich mich auf dem Rücken vermessen und er ist ein bisschen zu klein geworden. Darauf habe ich dann das Leder geklebt. Keine Ahnung, ob 'man' das so macht. Zumindest in diesem Microformat hat das gut geklappt:I left the litte pointy end of the leather as is was. It is too thin to work as a closure, but I like its looks. It would probably be annoxing if you wanted to use the book, but how do you want to use such a small book anyway? Here are some more pictures of this teeny tiny book and my first experiments with paring leather:

Das Buch hat sein Schwänzchen aus Dekorationszwecken behalten. Hier noch ein paar Bildchen.

Sunday, October 19, 2008

Linoleum Teil 3: Details zum Werkzeug und eine Buchrezension

Das ist der dritte von drei Teilen rund um meine bescheidenen ersten Versuche mit Hochdrucktechniken. Im ersten Teil habe ich von Frust und Freude bei meinen allerersten Experimenten gesprochen. Und davon, dass ich das oben stehende Linolschnittbesteck gekauft habe, das ich heute nochmal ausführlicher beschreiben will. Im zweiten Teil ging es um ein anderes Material: ein weiches Gummi. Und heute geht es wie gesagt nochmal detaillierter um das Werkzeug und um ein Buch, das ich gestern gekauft habe und euch allen warm ans Herz legen werde. Aber eins nach dem anderen.

This is the third and last part of the description of my first steps in the block printing wonderland. In the first part, I wrote about my very first lino cuts and my hurting wrists. The last bit was due to this innocent looking lino cutting equipment you can see at the top of this page. Yesterday I wrote about rubber stamping materials and today I am going to speak in more detail about the tools and I will review and praise a new book I bought: 'Handmade prints' from Anne Desmet and Jim Anderson.

Erstmal das Besteck dort oben im Detail: Das große Ding links unten im Bild ist ein Griff, mit dem man die Federn wieder aus dem Holzgriff herausziehen kann. Darüber liegt das Konturenmesser, mit dem man alle Kanten auf die man Wert legt vorschneiden sollte. Im Griff befestigt ist ein großes U-Holeisen, daneben liegen ein kleineres U-Hohleisen, ein größeres V Hohleisen und ein feines V Hohleisen. Im deutschen Sprachraum scheinen die auch Namen wie Riller und Geissfuss zu haben - bin da aber nicht so sicher. Die U-Hohleisen benutzt man, wenn man größere Flächen gleichmäßg abtragen will. Die V- Hohleisen benutzt man für feinere Linien, entlang Konturen und für Linien mit variabler Tiefe (und durch die Form damit auch Breite).

In the photo above you see on the lower left corner the extractor that helps getting the cutters out of the wooden handle. Above this is the straight knife which is used to precut contours. In the handle is the large U-shaped gouge, to the right follow a smaller U-shaped gouge, a large liner and a liner. The gouges are used for larger shapes where the Linoleum should be evenly taken away. The liners are used for small lines, along contours and for lines of variable depth and width.
I suppose not all such systems of one handle with several knives have to be bad. Maybe not even all such sets from this company are bad, maybe I was just unlucky. But these specific tools I bought were really crap because they are so dull.And apparently it is impossible or at least very hard to sharpen them.
On the package you can read: "Li
nocut items are cutting tools warning: keep away from children." This made me wonder from the start whether there was something wrong with these tools, because my tool really aren't sharp at all. But since it was the first time I ever worked with linoleum I somehow supposed that this is like they are. This dullness was the main source of the problems I had: The linoleum was very hard to cut. And with the rubber material I had difficulties at the ends of cuts, where I couldn't cut through the last bit of rubber, that would still hang on to the block, such that I had to rip it off by hand.

Ich hatte mit diesem Linolbesteck ganz schön Pech. Wahrscheinlich sind solche Federnsysteme nicht immer so furchtbar wie meines war. Vielleicht sind auch gar nicht alle von dieser Firma so schlecht. Aber mein Besteck war einfach von Anfang an viel, viel zu stumpf. Meine Löffel sind schärfer. Naja, nicht alle ;-)
Auch mit dem weichen Stempelmaterial hatte ich Schwierigkeiten mit diesem Besteck und zwar immer an den Enden wenn ein Schnitt irgendwo enden sollte. Dann konnte man das letzte Stückchen Material, das man gerade eigentlich durchschneiden wollte, schier unendlich ziehen, wie Kaugummi, ohne es zu durchschneiden. - Ich habe es dann immer mit den Fingern abgereissen müssen.

Jetzt habe ich aber ein neuen neuen Satz Werkzeug gekauft:
Es handelt sich um die Gerstaecker Linol- und Holzschnittgarnitur, die ich im Angebot für 14 € bekommen habe. Der erste auffällige Unterschied ist natürlich, dass es sich um Werkzeuge mit jeweils eigenem Griff handelt. Das finde ich in der Benutzung sehr angenehm, da ich vorher ziemlich viel hin- und herwechseln musste. Außerdem kann man diese Werkzeuge auch selbst schärfen (wenn man es denn kann) die Abziehsteine sind auch mit im Bild. Das Werkzeug ganz links im Kasten kenne ich noch nicht. Es sieht aus, als könnte man es gut benutzen, um größere flache Flächen im Holz zu haben - ich habe noch keine Verwendung dafür gefunden, das gleiche gilt für das rechts daneben. Dann folgen: V-Eisen, U-Eisen und Konturenmesser.
Die Arbeit mit den neuen Werkzeugen war herrlich! Das erste, was ich damit gemacht habe, war der Löwenschnitt, den ich hier letztens schon vorgezeigt habe. Das ging so leicht, als hätte ich das weiche Stempelmaterial unter den Händen. Ach was, besser, weil es sich jetzt genauso liecht schneiden ließ und ich es außerdem immernoch leichter finde, im Linoleum die Konturen hinzubekommen. Nach dem Löwenschnitt war ich mir sicher, dass ich weiter Linolschnitte machen will, und so habe ich mir das Buch bestellt, dass ich gleich vorstellen werde. Das wiederum hat mich dazu gebracht, nochmal mit dem weichen Material zu arbeiten: Und was soll ich sagen - es ist ein Traum! Konturen sind immernoch schwieriger zu machen, weil das Material sich schon auf leichten Druck verformt, aber alle anderen Schwierigkeiten haben sich völlig erledigt.


And then I bought this new set of tools. They were advertised as linocut and woodcut tools, but they seem to be rather woodcut tool. I haven't used the first two tools on the left so far (probably more important when working with wood). Then there are the U-shaped and the V-shaped gouges and the straight knife. The first apparent difference to the first kit is that they all have their own handles. I like that much better since I chanced the knives a lot during work. These tools also can be sharpened - you see the arkansas stones on the top of the photo
I already showed you the first cut I made with these
new tools, the lion lino cut. It was so easy to work with these new tool - amazing! It was almost as easy as cutting the rubber material before. With finishing this cut I knew I wanted to continue printing, and so bought the book I am going to review below.
That book made me try the rubber material again, and and to my surprise with the new tools it was also much easier to work with the soft material. At first I didn't like the rubber, but now I think it will have its place in my artwork. My recommendation to you: When you want to start lino cutting, invest some money in your tools. They are not awfully expensive (I got the better ones in a special offer for 14 €).


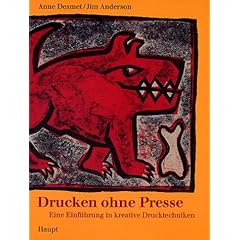
Und nun endlich zu dem Versprochenen Review. Es geht um das Buch "Drucken ohne Presse. Eine Einführung in kreative Drucktechniken" von Anne Desmet und Jim Anderson, Haupt 2000, Englischer Originaltitel "Handmade Prints".
Zunächst mal ein paar Fakten:
Das Buch hat mich bei Amazon rund 27 € gekostet. Dafür bekommt man eine gebundene (!) Broschur mit 143 Seiten.
Linolschnitte bilden nicht des Schwerpunkt in diesem Buch. Die einzelnen Kapitel lauten:
  1. Ausrüstung & Material
  2. Papier herstellen und marmorieren
  3. Körperabdrucke
  4. Abdrucke von Krimskrams
  5. Brauchbare und preiswerte Druckformen
  6. Leim & Collagendrucke
  7. Holz- und Linolschnitte
  8. Stenoschnitte
  9. Holzstiche
  10. Drucken mit Schablonen
  11. Siebdrucke mit Papierschablonen
  12. Monotypie
  13. Textildruck
  14. Drucken auf Keramik
  15. Druck und Collage kombiniert
Es folgen noch ein Glossar und andere Listen. Die Kapitel sind sehr unterschiedlich lang. Kapitel 5 umfasst 25 Seiten, die meisten anderen 1-6 Seiten. Die Kapitel sind ähnlich aufgebaut: Zuerst gibt es eine kleine Einführung, in der das Material vorgestellt, ein historischer Einblick gegeben und eben allgemein ein bisschen aus dem Nähkästchen über die jeweilige Technik geplaudert wird. Es folgt eine Beschreibung der Grundtechnik, in einfachen, klar verständlichen Sätzen, manchmal in Arbeitsschritte aufgeteilt. Das Kapitel endet mit Ausblicken, was man alles noch ausprobieren und anders machen kann. Es enthält viele Beispiele, sowohl von den Autoren, als auch von anderen Künstlern und auch von Kindern.
Das Buch enthält keine schrittweise Beschreibung von Projekten. Dem Leser wird eher erklärt, wodurch und auf welche Weise eine Technik funktionieren soll und fordert einen teilweise explizit auf, die Details selbst herauszufinden. Wohl auch, weil es oftmals keine allgemeingültige, beste Art gibt, mit dem Material umzugehen. Die Autoren legen nahe: Probiere aus; richtig ist, was befriedigende Ergebnisse liefert.

Das Bild auf dem Cover hat mich zuerst denken lassen, dieses Buch richte sich vor allem an Grundschullehrer, aber das ist falsch. Obwohl auch diese sicher eine Menge Anregungen in dem Buch finden können, ist es nicht primär für die Arbeit mit Kindern gedacht. Ich fand' es etwas verblüffend, als im Haupttext eine Methode zum Übertragen von Kopien auf Druckmaterial empfohlen wurde, und nur kurz angemerkt wurde, man solle nur bei geöffnetem Fenster arbeiten. Aus dem Marginalien erfährt man dann: "Der Verzehr [des verwendeten Öls] kann tödlich sein."

Was mir gefällt: Man erhält eine Menge Tips zu den verschiedenen Techniken, auch zur Werkzeugpflege, Aufbewahrungen der Druckstöcke und vieles mehr.
Es werden viele verschiedener Möglichkeiten (auch zu einem ausgewählten Material) aufgeführt und nebeneinander gestellt. Der Leser wird dann aufgefordert, selbst zu experimentieren. Es gibt keine starren Handlungsanweisungen, sondern man wird von den Autoren geschickt in die Lage versetzt, selbst tätig zu werden.

Was mir nicht gefällt: Nichts. Ich könnte mir vorstellen, dass es Leute gibt, die lieber eine Serie von Projekten vorgestellt bekommen. Für die ist dieses Buch nichts. Wer wie ich schon als Kind auf Hilfe mit Geschrei reagiert hat ("Ich will das alleine machen!") für den ist das genau das richtige.

Fazit: Das Buch ist nicht billig, aber jeden Cent wert!

And now finally my thoughts on my new book "Drucken ohne Presse. Eine Einführung in kreative Drucktechniken" by Anne Desmet and Jim Anderson, Haupt 2000. It is a translation of an English original with the title "Handmade Prints". - I have only seen the translations.

The facts: I paid 26,90 € for the book, the original it is available at amazon.com for 26,47$. For that money you get a bound (not perfect bound) softcover with 143 pages.

The contents: Lino cuts are only treated on 20 of these pages. The book has 15 chapters in which it treats different styles of relief printing, from simple body prints to etchings. But all of it can be done - more or less - with household materials and without a press. Each chapter introduces first the history and characeristics of the material. Then you find a precise and quick introduction into the basic idea and technique, followed by a bunch of inspiring idea, possibilities and pictures of prints that are truly amazing.

What I like about it: It gives you an impression of how many possibilities there are for printing. It makes you want to try out new things. It is full of informations and tipps and tricks.
I like that it is not project driven like too many books on crafts I have seen so far. It doesn't take your hand, saying: oh look, today we are going to print snowmen on our coffee cups. For this we need... It rather helps you understand how and why a specific technique works and encourages you to find your own way of working with the material at question.
It is not a book that is primarily meant to be used in education of children, though some of the ideas and techniques may be fun to do with them. Most of the book is rather adressed at adult artists without professional printing equipment.

What I don't like about it: There is nothing I don't like about this book. If you are someone who finds inspiration rather in a series of formulated projects, you probably will not like the book. If you enjoy finding things out on your own, this book will be truely inspireing.

Final judgement: roughly 27 € is not cheap, but the book is worth its money. If you are interested in printing you should have a look at this book, maybe in your local library - and maybe it's worth a wish for next christmas?

So, ab demnächst geht es dann wieder um Bücher :-) Ich hoffe, niemanden durch diese langen Abhandlungen zum Druck abgeschreckt zu haben. Bis bald!

For the next posts I promise to talk about books again :-) I hope I lost noone through this rather extensive babbling about printing. I hope to welcome you here again!

Saturday, October 18, 2008

Linoleum Teil 2: eigentlich geht's gar nicht um Linoleum

Dies ist der zweite von drei Teilen, in denen ich von meinen bisher recht spärlichen Erfahrungen mit Linoleum erzähle. Im ersten Teil habe ich davon berichtet, dass das Schneiden von Linoleum mit dem Werkzeug, das ich mir gekauft hatte, ganz schön schwierig war. Deshalb hatte ich mich nach Softlino umgesehen - Merle vom Book Arts Forum hat mir großzügigerweise gleich ein Paket mit ihren Resten fertig gemacht, von dem sie sagte, dass sie es nicht mehr brauche. Leider ist es immernoch nicht angekommen. In einer anhaltenden und lebhaften Diskussion mit vuscor haben wir verschiedene andere Möglichkeiten des Materialdrucks diskutiert, und meine Neugierde wurde immer größer. Anfang Oktober kam dann eine Freundin aus Minneapolis, Minnesota nach Bonn zu Besuch - und sie hat mir nicht wenig von einem Stempelmaterial mitgebracht. Das habe ich natürlich gleich angefangen zu bearbeiten. Und das soll heute auch Thema dieses Posts sein. Im nächsten und letzten Teil geht es dann um ein Buch zum Thema Materialdruck, das ich euch ans HErz legen möchte und nochmal im Detail um Schnittwerkzeug.

This is the second of third posts where I show you what I have learned from 3 or 4 weeks of doing lino cuts. In the last post I told you that I found cutting the lino a pleasure and pain at the same time. To reduce the pain and increase the pleasure I started looking for softer materials. Merle from the Book Arts Forum generously sent a package on the way to me with rest of soft lino she still had - unfortunately it hasn't reached me yet. In the meantime I was getting more and more curious and wanted to try other things than just lino. At the beginning of October a friend from Minneapolis came visiting, and she brought me a rather big amount of stamping rubber :-) I was so happy when I started cutting it. My knifes went through the material as if it was butter. On the left you see the first stamp that I produced.
You think it not as good as my lino cuts? - Right you are. The material is easier to cut through, but that doesn't mean it is easier to produce good prints from it.

Dieses Stempelmaterial war erstmal total super! Das Schneiden war so einfach und leicht! Und man kann ein einem Tempo Bilder aus dem Material schneiden, von dem ich bei Linoleum nur träumen könnte. Nach den ersten bescheidenen Versuchen (s.o.), habe ich mich dann an ein etwas größeres Projekt gewagt:Das kleine Büchlein heißt 'Love'. Zum Klischee passend sind die Seiten innen rosafarben. Übrigens handelt es sich um das mit roter Beete gefärbte Papier. Der Umschlag besteht aus Lokta Papier, und ich habe es schon so blau gekauft. Der ganze Inhalt sind 6 Drucke, alle aus dem Stempelmaterial geschnitten. Auf jedem Stempel sieht man drei Wesen um einen Gegenstand fliegen, auf einem etwa Fliegen um einen Scheißehaufen, auf einem anderen Ufos um einen Planeten.
Diesmal habe ich jeweils einfach mit einem Bleistift auf dem Material gezeichnet und dann losgeschnitten. Anders als beim Linoleum kann man hier auch schmale Grate stehen lassen, weil das Material eben ganz gummiartig ist und nicht wegbricht. Genau an der Stelle, bei der ich die Brüchigkeit des Linoleums gelobt habe, beim Ausarbeiten feinerer Details, ist dieses Material dann allerdings problematischer gewesen. - Jedenfalls mit dem Werkzeug, das ich zu diesem Zeitpunkt noch hatte.
Im ganzen war ich von dem Material erstmal ziemlich enttäuscht. Es ließ sich zwar wirklich leicht bearbeiten, aber schöne Drucke davon zu produzieren war keineswegs leichter, und ich habe das Zeug erstmal weggelegt. - Bis heute!

Right after this first try with butterflies I started a slightly bigger project: the booklet 'Love'. You can see it in the photo above. It is a pamphlet binding with 6 sheets of paper inside. The inside pages are those that I colored with beet root b.t.w. The content of the booklet are 6 prints, or stamps, cut from this rubber stamping material:
  1. three butterflies circling a flower
  2. three UFOs circling a planet
  3. three mosquitos circling a candle flame
  4. three moths circling a light bulb
  5. three astronauts circling their star rocket
  6. three flies circling a piece of sh*t
You see why it is called love ;-) I was not very pleased with the material, though. It was easy to cut, right. And it was much faster to work with than linoleum! But exactly at that point where I said that the fact that linoleum is hard and brittle helps, when trying to carve out fine details, there the rubber material is just so much worse than linoleum. Therefore I decided I'll have to wait for the soft lino to reach me and in the meantime try to make do with linoleum.

Therefore I ordered new (and better) tools (more about this in the next and final post). And turned back to linoleum - until today! Yesterday I bought a new book that I will review in the next post (tomorrow), from which I learned to print in colors. One of the techniques, the jigsaw puzzle, works just so much better with the soft material that I tried that again. And - with the new tools also the rubber cuts much better! The print to the left is a stamp of that material, printed with stamping ink (not linoleum paint as the others). I made it with a combination of the jigsaw method and the reduction method: I sketched the lion head with a pencil on the rubber. I cut away the pieces that form the mane. Then I cut the face completely away from the rest of the stamp (which than had a hole in the middle of course). I pressed the mane on a black and the face on a blue ink pad. I plugged the face back in the mane and voilá - I had a two-colored stamp. I stamped with that on a piece of paper. The result was a black mane with a blank blue face in the middle. I repeated this several times. Then I cut away everything from the face that is not black in the print. Pressed it on the black ink pad and stamped the contours of the face onto the prints.
With this soft material one can have small lines because the material is rubbery and doesn't break away like linoleum. I could do something similar with linoleum but if you want lines, this material is probably better suited.

Der Grund weshalb ich heute doch nochmal das Stempelmaterial hervorgeholt habe war, dass in dem Buch, das ich morgen ausführlicher besprechen will, verschiedene Methoden besprochen werden, wie man mehrfarbige Drucke erzeugen kann. Eine davon wird Puzzlemethode genannt. Dabei schneidet man seine Druckplatte in verschiedene Stücke, färbt sie unterschiedlich ein und setzt sie dann wieder zusammen. - Und dafür ist dieses Stempelmaterial wie gemacht:An diesem Ampelmännchenstempel sieht man schön, wie ich den Grünen erst rausgeschnitten, getrennt eingefärbt und dann wieder eingesetzt habe. Der Stempel liegt auf Abdrücken, die ich teilweise auch anders gemacht habe, das ist vielleicht irreführend. Ein Druck nach der beschriebenen Methode sieht dann so aus:

Dabei habe ich dann auch festgestellt, dass sich mit meinem neuen Werkzeug, das ich ebenfalls morgen erst besprechen werde, auch dieses Material sehr viel besser schneiden lässt. So schlecht finde ich es jetzt gar nicht mehr. Eben jedes Material für seinen Zweck. Der Löwe oben ist auch ein Stempel. Außerdem ist er ist nicht mit Linoldruckfarbe sondern mit Stempelfarbe gedruckt.
Eine andere Methode mehrfarbig zu drucken ist die Reduktionsmethode: Man druckt mit einem Druckstock (Stempel) in einer Farbe, schneidet dann etwas Material weg und druckt in einer anderen Farbe nochmal. So habe ich das Gesicht des Löwen weiter oben gemacht. Und das hier ist ein sehr simples Beispiel für diese Art zu drucken, das ich als Etikett benutzt habe:Dafür hatte ich einen Stempel aus dem zunächst nur die innere weiße Fläche herausgeschnitten war. Damit habe ich gelb gestempelt. Dann habe ich aus dem selben Stempel Rechtecke aus dem Rand rausgeschnitten (übrigens mit Hilfe eines Skalpels, kein anderes Werkzeug) und dann damit mit blau drübergestempelt.

Final judgement:
The cutting of and printing with this rubber material turned out very easy after I had new and sharp tools.
It is easy to have small lines since the material is not brittle. Sharp corners and delicate details are still harder to do (for me impossible to do) than with linoleum.

It seems to me that with them it is better to print with ink pads too. Which probably that is not altogether a surprise since they are stamps.
But to me they don't look as good as lino cuts. There is something different about those that is hard to describe. I did the lion's head also with linoleum; this is just a trial proof on a probably unsuited paper in gray lino color. Do you see the difference?
In my simple prints it is maybe not visible at all.
I am very much looking forward to working with the soft lino, to see if that makes the difference!

Mein endgültiges Urteil: Der weiche Material macht Spaß, weil es so leicht und schnell zu verarbeiten ist. Außerdem sieht man darauf den Bleistift gut. Man sollte vielleicht lieber Stempelfarbe als Linoldruckfarbe benutzen. Ich habe nicht so viele verschiedene Stempelkissen, aber mein Experiment oben mit dem Löwenstempel scheint das nahezulegen.
Irgendwie mag ich letztendlich aber Linolschnitte doch noch lieber. Das Druckbild sieht irgendwie anders aus. 'Zum Vergleich habe ich den Löwenkopf auch nochmal in Linoleum geschnitten. Direkt hier oben drüber ist habe ich einen Probedruck davon in grauen Linolfarbe eingebunden.
Ich finde es schwierig, genau zu sagen, was es ist, und in meinen einfachen Schnitten ist das vielleicht gar nicht zu sehen, aber mir scheint, mit dem Stempelmaterial verschmieren die Kanten mehr. Vielleicht ist es auch was anderes, ich kann das schlecht genau sagen.
Ich freue mich jedenfalls schon auf das weiche Linoleum, um zu sehen, ob das nochmal anders ist.

Das war's dann für heute. Morgen geht es mit dem Review des Buchs 'Drucken ohne Presse' von Anne Desmet und Jim Anderson und einem Bericht über mein neues Werkzeug weiter - bis dann!

P.S.: Just in time before posting this, I saw vuscor's remark on the post on the lion print. He pointed us to this discussion about the differences between soft rubber material and traditional lino: http://www.flickr.com/groups/block-prints/discuss/72157606403589476/ You can find really useful informations there. That's why I repeat it here, just in case you overlooked it in the comments section. - Thank you, vuscor!

Friday, October 17, 2008

Linolschnitte Teil 1: mein erstes Werkzeug, meine erste Woche

Seit ich vor drei Wochen das erste Mal hier einen Linolschnitt präsentiert habe, bin ich von verschiedenen Leuten gefragt worden, ob das schwierig sei, welches Werkzeug ich benutze usw. Darüber will ich jetzt ein bisschen erzählen (obwohl das weder mit Leim, noch mit Zwirn zu tun hat ;-) Weil ich mittlerweile schon relativ viel zu sagen habe, habe ich mich entschieden, den Stoff in drei Posts aufzuteilen. Los geht's:

Vor etwa vier Wochen habe ich in meinem Schreibwarenladen dieses Linolbesteck gesehen und spontan mitgenommen. Ich hatte vorher *noch nie* mit Linoleum gearbeitet. Ich kenne Leute, die als Kinder in der Schule oder zu Hause Erfahrung damit gesammelt haben, aber für mich war das komplett neu.

Several people asked my whether lino cuts were hard to do, what kind of tools I am using, how to get the image to the lino and so on. Therefore I decided to let you have a peek into my explorations of the world of block prints. It is really that: Other than for example my husband I had no prior experience with printing. Neither with letters, neither with linoleum. I did some stamping with potatoes on a T-shirt when I was 4 years old and in Kindergarten, but that's it. So I have very limited knowledge on that matter. That said - let's see what I can tell you so far. There will be 3 posts on that matter, one for each week I have been printing.

The box you can see
the picture was my ticket into the world of printing. I saw it while shopping for some other things and decided to take it with me. It was cheap. It had everything included to start a first print and it said it included a manual.

Der Vorteil dieser Box: Es ist alles enthalten, um gleich loszulegen außerdem wurde außen eine Anleitung versprochen - was kann also schiefgehen?Auf den ersten Blick sieht die Anleitung o.k. aus. Schauen wir weiter. Die Überschrift ist dreifarbig und auf französisch - französisch?/italienisch? - und deutsch. Der braune Text sollte also deutsch sein. In der Mitte unter der Überschrift Les outils gut im Blick... Bei genauerem Hinsehen kann man feststellen, dass die Anleitung auf französisch, französisch und französisch ist. Dabei nicht etwa einfach auf französisch, sondern wirklich jeweils jedes Kapitel in drei Farben und jedesmal exakt die gleiche Buchstabenfolge. Leider stellte sich heraus, dass ich die Sprache nicht gut genug beherrsche, um dieser Anleitung zu folgen.

Unfortunately, the manual only appeared on the first glimpse to be in German, the text was in French, French and French. So I watched a youtube video (I already included it in an earlier post, so this time I only give you the link this time) and simply started. But I gave up after just half an hour. My wrists were hurting and I suspected (correctly) that the motif I had chosen was not going to work. - I had tried to do what I warned you about in my recent post: I sketched on the lino and tried to carve out everything except my lines, so that only the drawing would remain. Linoleum is generally too brittle to work well that way. Especially for a start, you should rather head for large areas than for thin lines.
I can't really tell why I picked it up again on the next day. Probably because I love challenges and don't easily give up. And somehow I feel something magical about printing, the wonders for applying color to a paper creating something new that way.

Trotz der fehlenden Anleitung entschied ich mich, einfach mal anzufangen. Die Versuche dieses Abends habe ich allerdings nicht einmal annähernd zu Ende geführt, und ich war ziemlich frustriert.
Am nächsten Tag erwachte wieder mein Kampfgeist: Wenn andere das können, dann werde ich das doch wohl auch hinbekommen!
Diesmal habe ich nicht versucht, mir ein Motiv selbst zu wählen (das war am Vortag ja schief gegangen), sondern habe mich erstmal umgesehen und habe ein mittelalterliches Motiv kopiert . Der erste Schnitt, den ich dann gemacht habe, war gleich relativ kompliziert (s.links). Was geholfen hatte war zum einen diese Anleitung, die ich dann doch nocht gefunden habe und die einfache Tatsache, dass ich mir vorher überlegt hatte, welche Flächen (sic!) farbig sein sollen. Die Leiber der Vögel enthalten feine Linien z.B. um die Flügel anzudeuten - die mussten natürlich Aussparungen werden - und damit war das dann entschieden.
Für solche relativ kleinen Muster nimmt man zuerst ein Messer, um die Konturen herauszuschneiden. Kleine Eckchen kann man auch mal ganz mit dem Messer herausnehmen, bei größeren Ecken fährt man mit dem Schnittwerkzeug bis fast ganz an den Schnitt heran und dann bricht der Rest exakt weg. - Dabei ist es von Vorteil, dass das Linoleum etwas spröde und brüchig ist. Das Motiv habe ich durch einen ganz simplen Trick auf das Linoleum bekommen: Mit einem weichen Bleistift habe ich die Konturen des Originals nachgezeichnet und dann das Blatt aufs Linoleum gerieben.

When I gave it another try on the next day, I decided to not try to draw my own picture but use a given motif. What helped a lot was that before cutting, even before deciding for the motif, I thought about what areas (!) of the picture were going to be colored and which will be white. The birds on that emblem have little lines inside for example for their wings. It was clear, that this will have to be white - and the rest was then a natural choice. I don't think is was the easiest picture to start with, but succeeding was even more encouraging that way.

And I found another tutoral (in German only, sorry) that explained the use of the tools which was a great help. So I cut the contours of the pictue with a knife first. And then started to carve out more of the lino. Very small pieces can be taken out simply by the knife, for larger areas you cut with the appropriate chisel up to the contour cut and it easily and exactly at the right spot breaks away. At this moment, the fact the linoleum is hard and brittle is rather helpful.

So, das war meine allererste Erfahrung mit Linoleum. Mich hat daraufhin geradezu ein Druckerfieber gepackt. Ich fand Schrift schon immer faszinierend: Man macht ein paar Farbkleckse auf Papier und aus ein paar schwarzen Stellen auf weißem Papier wird eine Abhandlung über den Sinn des Lebens. Wenn das nicht Magie ist! Und mit diesen Drucken ist das so ähnlich. Ganz verstanden habe ich mich da auch noch nicht. Das einzige Problem bis hierhin: Nach jedem Schnitt haben mir die Handgelenke ganz schön weh getan. Deshalb hatte ich mich nach anderen Möglichkeiten umgesehen. Meine erste Idee was 'Softlino', das in den USA verwendet wird. Eine Probe davon ist noch zu mir unterwegs, aber leider noch nicht angekommen. Ich warte noch darauf.
Aber letzte Woche kam eine Freundin aus Minneapolis hier an und hat mir Stempelmaterial mitgebracht - davon werde ich morgen erzählen. Und diese Woche habe ich mir ein Buch zu dem Thema gekauft - das ist zusammen mit meinem neuesten Werkzeug übermorgen dran.

So these were my first experiences with linoleum. It was fun and magical and all. But it was so hard to do, took a lot of time and my wrists hurt bad after a day of cutting. Therefore I was looking for alternatives. A fellow bookbinder from the books arts forum sent me a piece of soft lino. I havn't recieved it yet but I am very much looking forward to trying it. In the meantime I experimented with rubber (for stamps), bought me wonderful new tools and a book on that subject. I will review these on the next days. Stay tuned!

Thursday, October 16, 2008

New Lino Print

Ab 17. November geht's bei mir ja los: Ich werde ab dann versuchen, mein Geld über Buchbinden, Buchkunst, Verkauf von Materialüberschuss (es wird auch farbigen Leinenfaden geben) und extra angefertigen Tagebüchern zu verdienen. Die ersten Aufträge kommen gerade schon rein. Einer von ihnen hat sich ein Tagebuch mit einem Löwen auf dem Cover gewünscht. Und da habe ich gestern mal einen Löwenlinolschnitt versucht. Für das Buchcover wird der nicht taugen, dafür ist er zu groß: etwa A5 quer - für das Titelbild werde ich wohl nur einen Kopf oder so etwas ähnliches machen.
Billie hat letztens mal gefragt, wie ich so einen Schnitt mache. Alse zeichne ich die Arbeitsschritte mal kurz nach.

I was commissioned to make a journal with a lion on the cover. I bought new tools just the day before that, and couldn't wait to work with them. And so I interrupted my work on 'evolution' again - above you see the result. It is a simple cut, which I did in a few hours. I had a look at the Flickr Block Printing Group - wow, that was inspiring. I am learning lino cutting and printing mainly from trial and error, so looking at the work of other people is important to me, so I see what can be done.
I am not very good at sketching. Especially not without seeing any model at all (and I don't have a lion here in my studio to look at). So the first thing I did was internet searching pictures of lions. First I had a look at some photos, but then I also looked for lion lino cuts. Three of them had a major influence on my cut. I have no permission to show you the pictures here, but I'll give you the links and you can see for yourself:


Ich bin nicht sehr gut im Zeichnen. Schon gar nicht einfach so aus dem Kopf und ohne Vorlage. Also habe ich mir erstmal einige Photos von Löwen angesehen - und habe dann auch einige Linolschnitte gesehen. Das hat mir ziemlich geholfen und das Motiv, das ich letztendlich gezeichnet habe, ist gar nicht so furchtbar originell - es fließen drei Hauptquellen ein: Die Mähne ist so ähnlich, wie die von Simba von Walt Disney - es gibt da so einen Linolschnitt, der sehr einfach ist - das hat mir gefallen. Die Idee, den Löwen auf eine Ebene bei Nacht zu setzten, habe ich bei Mark Hearld geklaut. Ich mag aber vereinfachte Zeichnungen lieber als realistische; mein Löwe ist dann angelehnt an einen Linolschnitt von Julie Paschkis.

The first one I saw was the head of Simba by Walt Disney. It liked it for its simplicity.
The second I saw was this awesome cut by Mark Hearld. I especially liked the atmosphere created in this cut by adding the ground and the stars.
And then there was a third cut I liked for its simplicity and naivity by Julie Paschkis.

If you had a look at all three of them then you can probably quite clearly see where they entered my cut.
First thing I did was a sketch with pencil on a cheap piece of paper.

Als erstes habe ich diese Bleistiftzeichnung gemacht. - Ich glaube, jetzt wo ich das so sehe, gefällt mir die Mähne da noch besser als wie sie jetzt ist... Für den Kopf für das Tagebuch, werde ich also nochmal anders arbeiten. Die groben Umrisse habe ich mit einem weichen Bleistift nachgezeichnet und auf das Linoleum gerieben. Diese Beistiftlinien dienten mir als Hilfslinien für eine zweite Zeichnung auf dem Linoleum. - Und dann kann man schneiden, Probedrucke machen und letztendlich drucken.

Then I traced the general lines with a soft pencil and rubbed it onto the lino to serve as guidelines. On the lino I did a second sketch with chalk. I used this chalk pen for the first time. The advantage is that the lines are clearly visible. But it makes very thick lines that don't allow small details.

Next thing is, you have to decide where the print should be black, and where it should be white. With lino, other than stamps, it is preferable to think about areas as apposed to lines. It may be tempting to try to carve everything away but the lines but this won't work properly, because the material is too brittle and will break away.

When the cutting is done I do some experimental prints to maybe correct the cut a little bit (this is the picture you see at the top) and then I started printing:For printing I lay down the linoleum flat on the table. I apply color (I use water based lino paint) I place a sheet of paper above. Softly press it down with a hand, so that it won't slip. And then I press is on with the help of another roller. In the picture at the top you can see the two rollers: the small gray and black one on the left I use for spreading the paint, the bigger red one on the right, I use to press on the paper.

Zum Druckem braucht man nicht unbedingt teures Equipment - das habe ich auch nicht. Ich drücke das Papier mit Hilfe von Rollen an: Der Schnitt liegt dabei flach auf der Arbeitsfläche, ich lege ein Blatt Papier darauf und drücke es mit Hilfe einer zweiten, größeren Rolle (im Bild ganz oben ist es die rote rechts) fest an. Dann kann man das Papier von dem Linoleum abziehen und muss es für einige Stunden trocken lassen.

And this is a scan of the finished print / Und hier noch ein Scan von einem der Drucke:Viel Spaß beim Ausprobieren und Nachmachen! Gute Werkzeuge sind in diesem Fall übrigens wirklich nützlich. Ich habe für diesen Schnitt einen neuen Satz Schnittwerkzeuge benutzt, der wirklich scharfe Messer enthalten hat - und es ging so viel besser als vorher! Ich werden demnächst vielleicht nochmal was über das Werkzeug bringen.
Man kann natürlich außerdem noch viel coolere Sachen machen. Schaut euch mal auf der Flickr Photo Group Block Prints um. Da kann man Erstaunliches finden! Ich habe mir jetzt ein Buch bestellt, aus dem ich hoffentlich lernen werde, wie man zweifarbig druckt.

Bis demnächst!

Wednesday, October 15, 2008

The Cure for Bookbinding Frustration: Shopping for books

I knew the following video already for some time: Don't you think this is a truly amazing alphabet book? So when I saw it yesterday in my bookstore - I simply *had* to buy it!


Das Buch aus dem Video habe ich gestern in meiner Buchhandlung zwischen den Kinderbüchern (?!) stehen sehen. Anscheinend meinten diejenigen, die für's Aufstellen zuständig sind, dass Bücher die nichts außer dem Alphabet enthalten, in die Leseranfängerabteilung gehören. Zwischen den Pappbüchern und Vorlesebüchern standen 5 Exemplare in der Regalecke. Hätte ich das Buch nicht schon von dem Video gekannt, hätte ich es bestimmt übersehen.

Tuesday, October 14, 2008

Von der Schwierigkeit, Dinge zu Ende zu führen

Nach dem Büchermachen am Wochenende, werde ich gerade etwas langsamer. Eigentlich wollte ich gestern schon wieder mit der inhaltlichen Arbeit weitermachen, aber irgendwie bin ich doch nicht dazu gekommen. Geht es euch auch so: Dinge anzufangen macht viel Spaß und geht schnell, aber sie zu Ende zu bringen wird schnell langweilig und dauert dann so lange. Ich habe ständig mehr Ideen für Bücher, als ich dann wirklich machen kann. Dann entscheide ich mich, einige davon umzusetzen und noch während ich dabei bin, kommen mir so viele andere Ideen, dass es viel attraktiver ist, was Neues anzufangen, als das begonnene Werk zu Ende zu führen. So mache ich denn einen Prototyp nach dem nächsten, ohne wirklich gute Arbeit zu machen. Im Moment habe ich etwa 6 Projekte angefangen, die noch auf ein Ende warten. Höre ich mich ein bisschen frustriert an? - Na, vielleicht bin ich das auch.

Today I am a bit frustrated with myself. I start too many projects and finish too few of them. Is it the same for you: While I try to finish one project, I have ideas for several new ones. I keep a notebook where I write down all the ideas because I fear that I may forget them. This book is a good thing per se, it works a bit like a destille - several ideas are put together over the time and are destilled into one new project. When I write down one of these many minor ideas and suddenly see a connection between some of them, the prospect of this new book thrills me much more than finishing the one one I am currently working on. So, although I wrote down something so that I can go on working in peace, I think I could interrupt my work for just a quick prototype of the new one, just to see whether it works... I am actively (more or less) working on 6 projects atm. Is it for everyone so hard to finish something properly?

Yesterday I distracted myself from working on content by trying a new binding: The buttonhole binding. I used this tutorial here. I managed to sew this book with the tutorial, so I can't be too bad, although I found it a bit too wage sometimes.

Jedenfalls habe ich mich gestern wieder vor der inhaltlichen Arbeit gedrückt und mich von künstlerischer, eher handwerklicher Arbeit zugewandt und eine neue Bindung ausprobiert: Buttonhole Binding. Das Tutorial, nach dem ich gearbeitet habe, war so mäßig gut. Es gibt Sätze wie: "Und nun durch das oberste Loch stechen, hinterdem Burchrücken her, durch die Schlaufe durch und wieder zurück." Und man fragt sich: Soll ich von innerhalb der Lage stechen oder von außen in die Lage hinein, heißt hinter dem Buchrücken zwischen Buchrücken und Buchblock, also innerhalb von Buch oder außerhalb vom Buch usw. Aber solcherlei Rätsel mag ich eigentlich und denke, ich habe die Bindung selbst verstanden und einigermaßen hinbekommen, wenn auch einige der Knoten noch ungleichmäßig sind:
Ich bin stolz, dass es überhaupt im ersten Versuch geklappt hat, aber im Ganzen bin ich nicht wirklich zufrieden: Man sieht das weiße Innenfutter des Einbandes so sehr blitzen. - Das gefällt mir gar nicht. Auf Flickr ist das Buch schon recht beliebt, aber das liegt wahrscheinlich eher an den wirklich herrlichen Farben dieses Lokta Papiers. Ich habe jeder Lage einen Streifen davon verpasst, denn diese Art Bindung ist ja dazu gemacht, schönes Papier vorzuzeigen.

Naja, mal schauen, was ich heute noch so fertig bekomme. Heute Abend mache ich jedenfalls mal was ganz anderes und gehe zu einem Keramikworkshop.

I am proud that I managed to do this book on the first try. But the white bits of the inside covering paper visible from outside the book annoy me. I'll have to try a new one, maybe the next book will be smaller - this is 25cm high and 15 cm wide, quite big in comparison with my other books. I think, I will have to make a buttonhole matchbook in this week. :-)